Best FlyingPress Settings for 95% WordPress Websites in 2025 [Import Configuration – Free]
👋 Need help building or fixing an Elementor website?
I design fast, conversion-focused WordPress sites using Elementor.
V5 Update:
FlyingPress v5 is finally here and honestly speaking, it’s beautifully re-engineered.
This FlyingPress best settings guide is based on version 5, so if you haven’t updated yet, I recommend doing that first to follow along properly.
This post is written for bloggers, small business owners, and Elementor users (almost 95% WordPress websites) who care about a fast site, but not at the cost of a dull, plain design.
Who This Guide Is For?
This isn’t your typical “speed guru” guide.
I'm not here to talk in technical jargon or squeeze out the last 2ms to chase some performance badge.
Instead, this guide is:
- Practical and beginner-friendly
- Focused on real-world performance
- Designed for non-techy WordPress users
- Especially helpful for those using Elementor, page builders, or premium themes with a bit of flair
In short: If you want the best of both worlds – good design + fast load times; this guide will help you set up FlyingPress for that balance.
Here's a TOC for quicker navigation (jump to section you need flyingpress settings for)
Download My FlyingPress Configuration (One-Click Setup)
FlyingPress v5 allows you to import/export your entire config with a .json file.
So if you just want to skip the hassle and apply the settings I personally use:
To use it:
- Go to FlyingPress > Settings > Configuration Management
- Click on Import Configuration
- Upload the .json file
- Save and done.
You’ve successfully setup flyingpress settings in one-click
which you can customize according to your website needs.
Note: I Don’t Obsess Over Speed Scores
I get it – we all want fast-loading websites.
But I don’t believe in stripping away everything beautiful just to score 100/100 on PageSpeed Insights.
I’m not here for:
- Breaking layouts just to delay a 10kb font
- Removing creative visuals or animations
- Deleting design elements that make the site feel you
Instead, I optimize with common sense:
- Keep what’s necessary for user experience
- Remove what’s truly bloat
- Balance performance with personality
Let’s Jump Into the Best FlyingPress Settings (2025)
FlyingPress has a lot of powerful settings, but you don’t need to enable everything to get real speed wins.
In the next section, I’ll walk you through every single tab and option inside FlyingPress v5, show you what I’ve personally enabled or skipped — and explain the reasoning in plain English.
Let's dive in…
🚀 FlyingPress v5 Dashboard – Clean & Straight to the Point
Before we dive into the individual settings, here’s a quick peek at the new FlyingPress v5.0.2 Dashboard
& I must say, I love how neat and intuitive it looks.
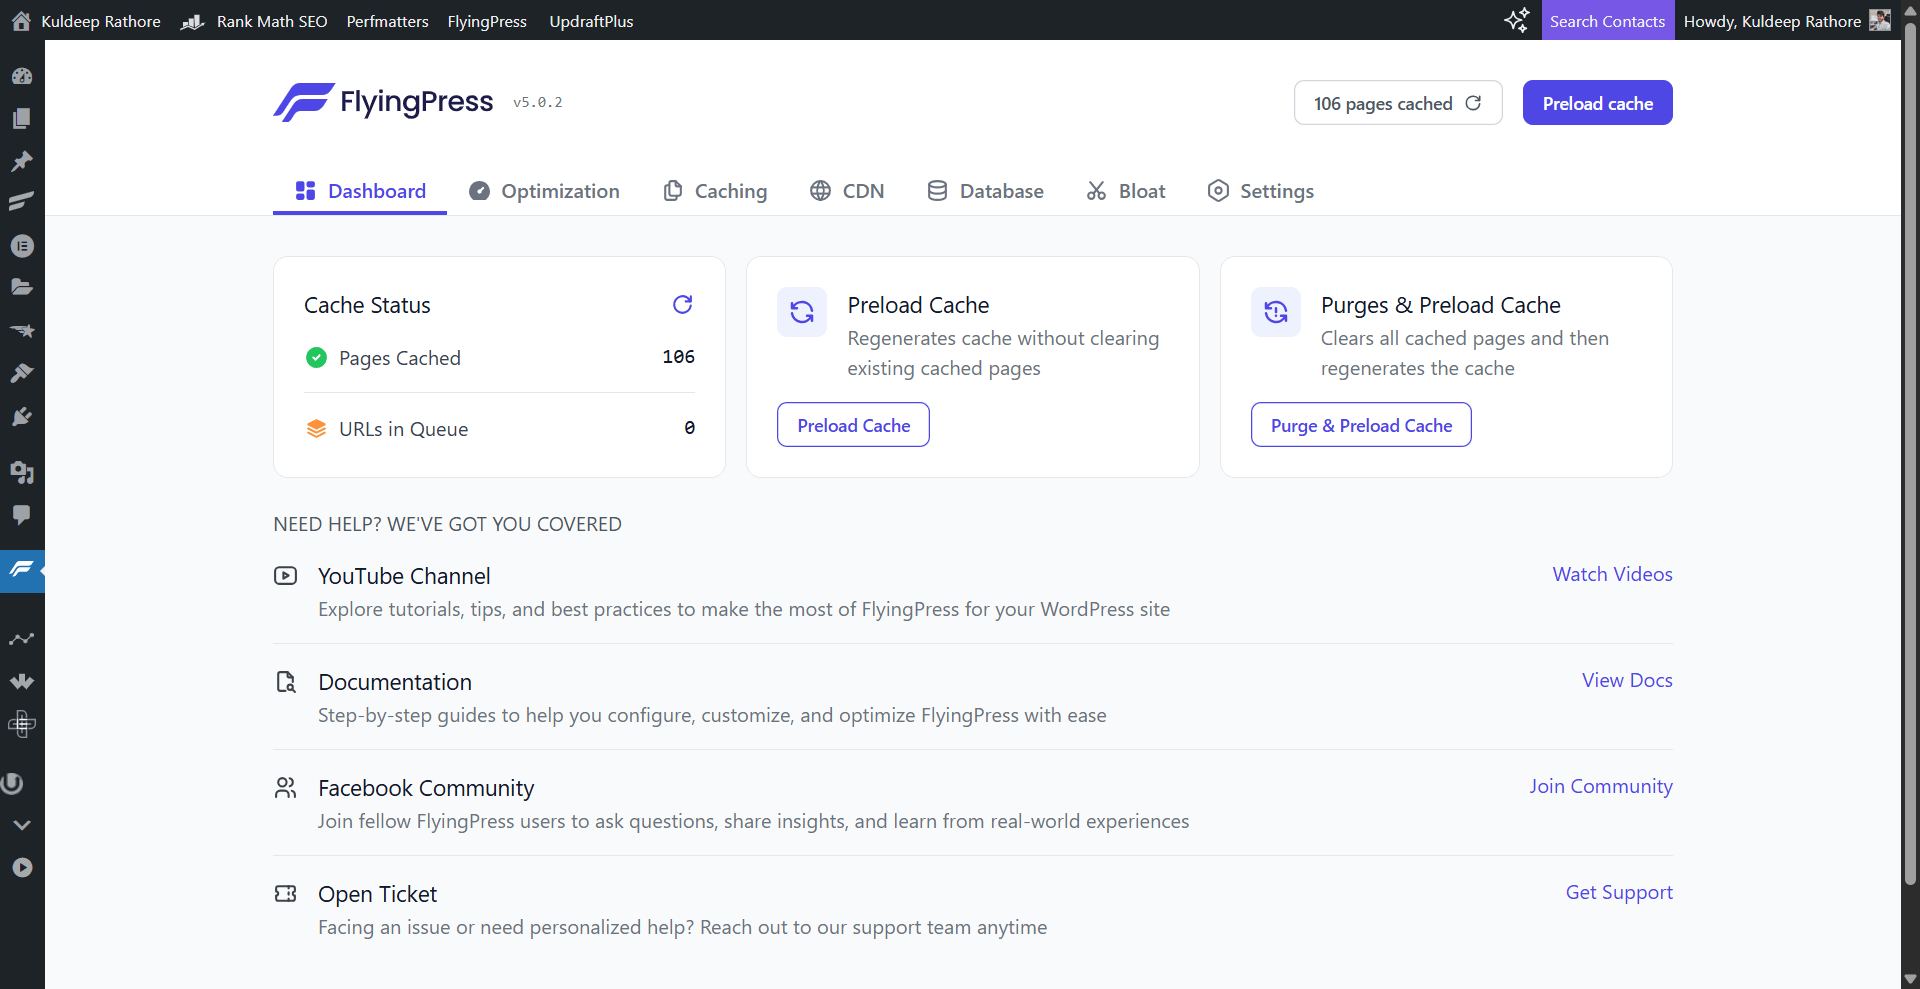
From here, you can:
- Preload cache in one click
- Purge + preload all cached pages instantly
- Quickly access their YouTube channel, docs, or the support team
- And of course, join their Facebook community — highly recommended if you want real-world advice from other users
It’s great to see that they’ve made these important actions and links more accessible – especially helpful for beginners.
This section is pretty self-explanatory, it shows you the cache status, provides you with two important quick actions & that’s all you need to know here.
Optimization Settings – My Recommended FlyingPress Settings
This is where FlyingPress really starts doing its magic. Under the Optimization tab, there are 4 main areas:
- CSS & JavaScript
- Images, Videos & iFrames
- Fonts
- Rendering
Let’s go through each with my current setup (and why I use it this way):
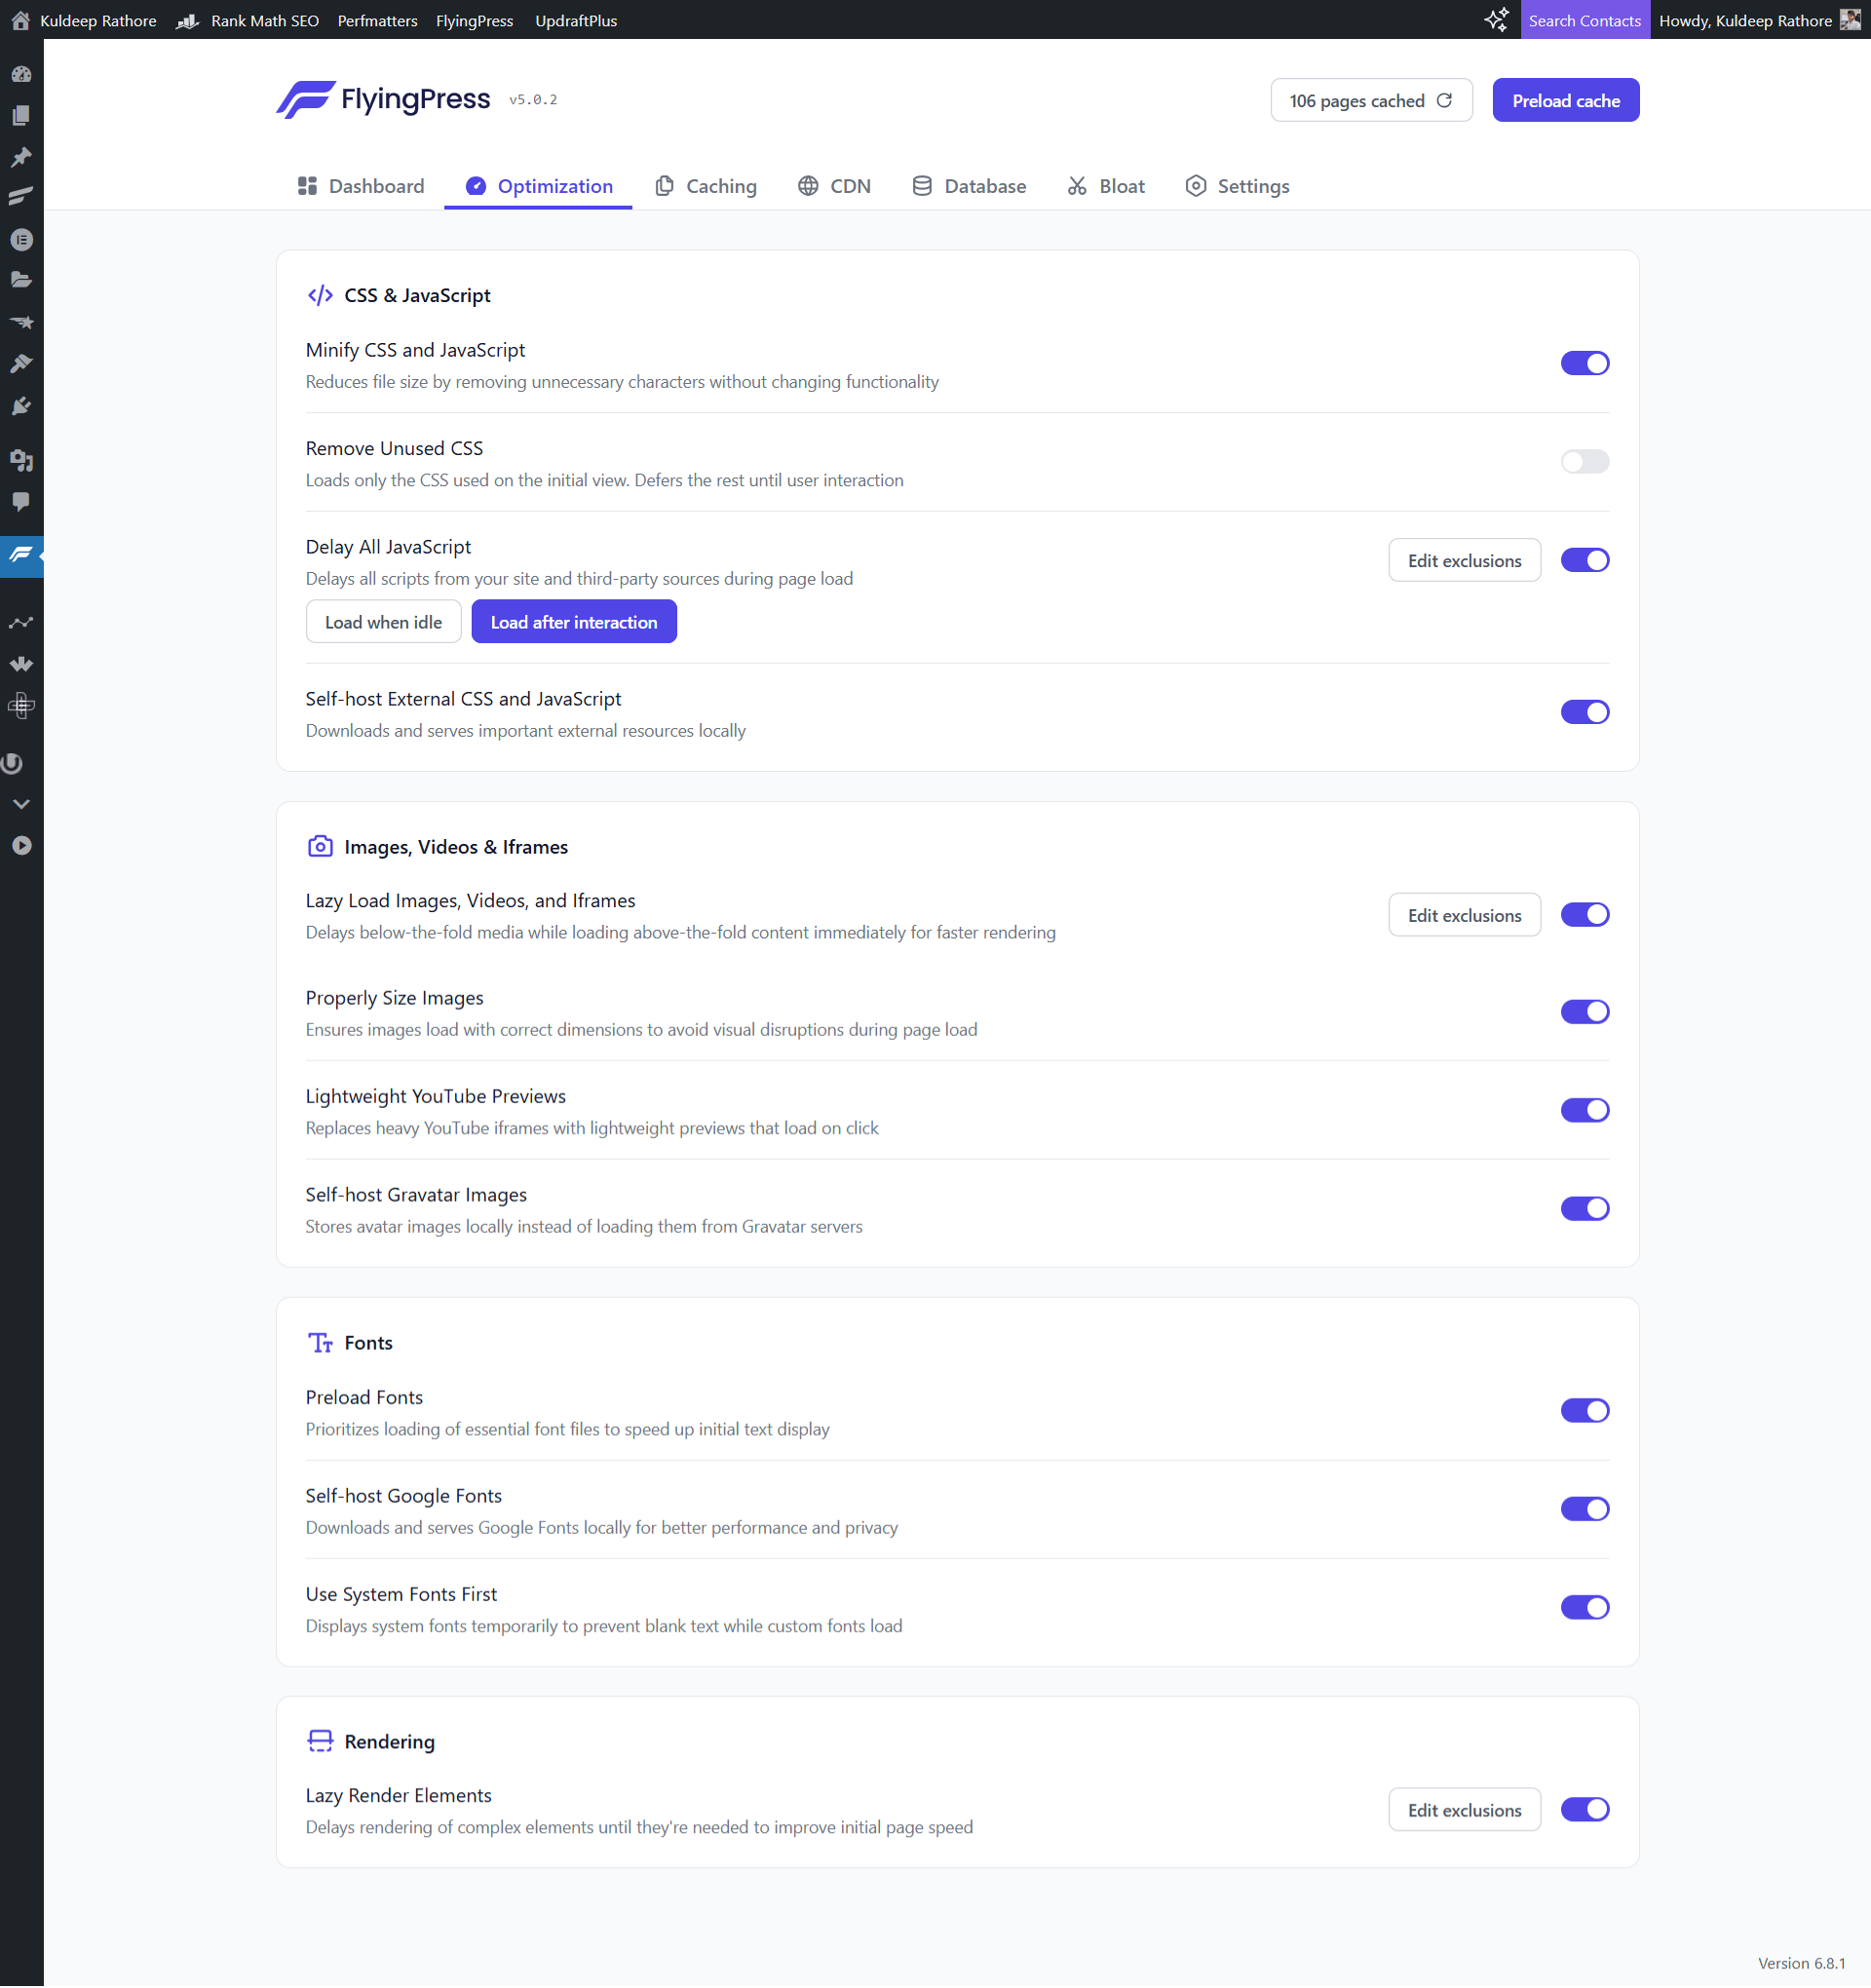
1. CSS & JavaScript
These settings help your site load faster by optimizing how your stylesheets and scripts behave.
| Setting | Status | Explanation |
|---|---|---|
| Minify CSS and JavaScript | ✅ On | Removes unnecessary characters/spaces from code. Safe and recommended to keep ON. |
| Remove Unused CSS | ❌ Off | ⚠️ I've turned this OFF — because in my case, it broke some layouts (especially with Elementor). You can try enabling this, but check your site carefully afterward. FlyingPress lets you exclude specific pages/components if needed. Just click “Edit exclusions” next to it. |
| Delay All JavaScript | ✅ On | Delays all JS until user interaction, improving performance scores. Works well in most cases. You can also manage specific exclusions. |
| Self-host External CSS and JavaScript | ✅ On | Keeps resources local, reducing external dependencies and speeding things up. |
💡Quick Tip: Click “Edit exclusions” to fine-tune things if something looks broken.
2. Images, Videos & iFrames
These settings are crucial for reducing load time caused by heavy images and embeds.
| Setting | Status | Explanation |
|---|---|---|
| Lazy Load Images, Videos, and iFrames | ✅ On | Loads below-the-fold media only when users scroll. Great for performance. |
| Properly Size Images | ✅ On | Ensures your images are served in the right dimensions. |
| Lightweight YouTube Previews | ✅ On | Replaces heavy YT embeds with a lightweight preview that loads on click. I use this — works perfectly and speeds up the site. |
| Self-host Gravatar Images | ✅ On | Gravatars can slow down blog comments. Self-hosting them improves speed. |
📌 Quick Tip: Lazy loading + lightweight embeds = smooth scrolling & faster loads, especially on mobile.
3. Fonts
Web fonts can be a silent performance killer. Here’s how I’ve configured mine:
| Setting | Status | Explanation |
|---|---|---|
| Preload Fonts | ✅ On | Prioritizes loading of essential fonts. Improves perceived speed. |
| Self-host Google Fonts | ✅ On | Downloads and serves them locally. More private and faster. |
| Use System Fonts First | ✅ On | Helps avoid the dreaded FOIT (Flash of Invisible Text). |
💡Quick Tip: If you're using custom fonts via a page builder like Elementor, these options still help streamline things.
4. Rendering
| Setting | Status | Explanation |
|---|---|---|
| Lazy Render Elements | ✅ On | Delays rendering of complex or non-critical elements. Improves initial page speed without breaking anything. |
That wraps up the Optimization tab.
This setup has worked great for me — offering a solid balance between speed and design.
Again, if you’re someone like me who’s into aesthetics and uses page builders, you don’t have to sacrifice design to gain performance — FlyingPress makes it easy.
Caching Settings – My FlyingPress v5 Configuration
Caching is where the magic starts. It helps your site load faster by storing ready-to-serve versions of your pages instead of rebuilding them from scratch every time.
Here’s how I have things set up:
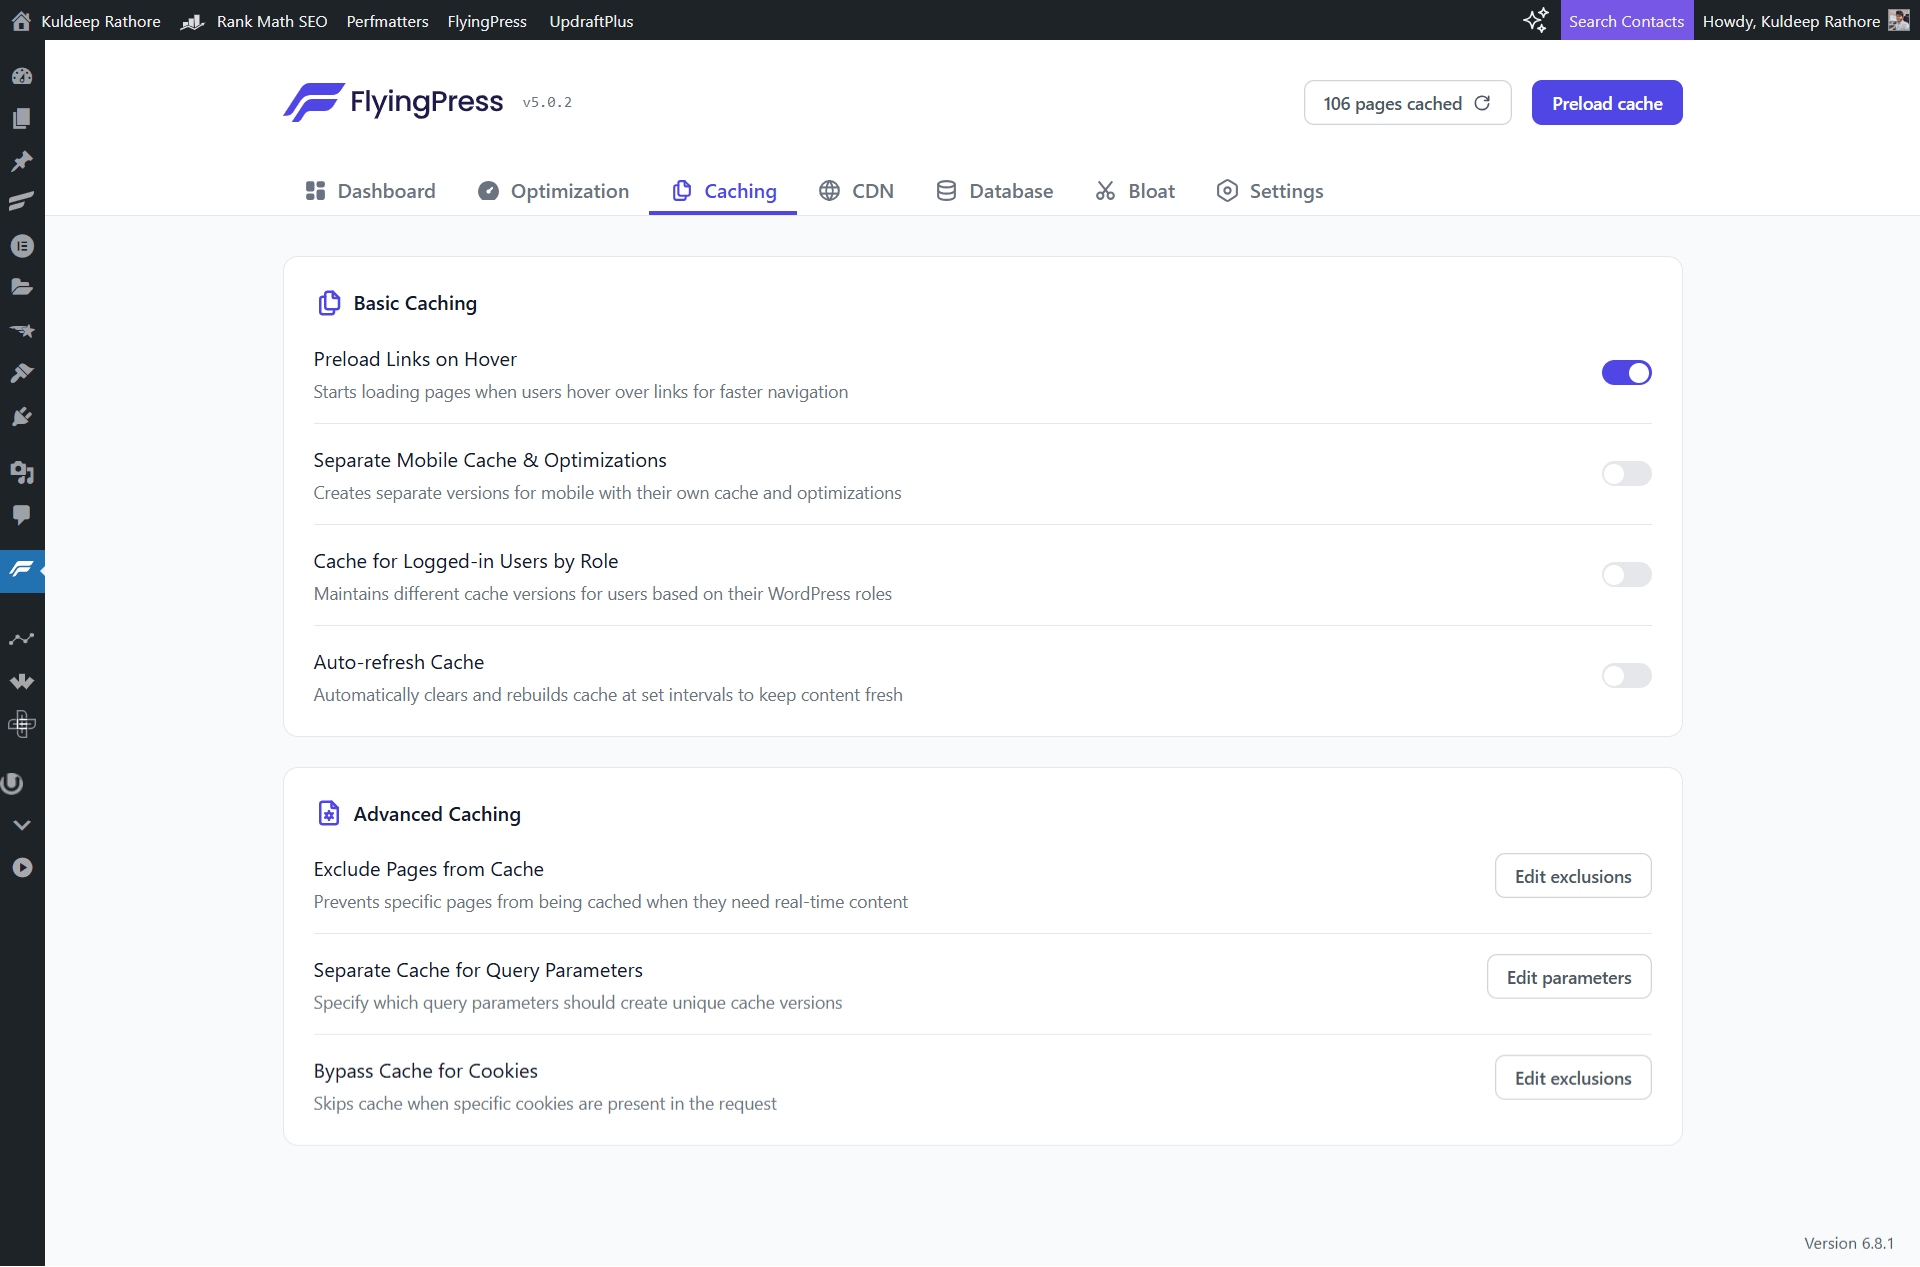
Basic Caching
| Setting | Status | Why I Use It |
|---|---|---|
| Preload Links on Hover | ✅ Enabled | Starts preloading the next page as users hover over a link. This makes page transitions feel instant — I highly recommend keeping this ON. |
| Separate Mobile Cache & Optimizations | ❌ Disabled | This creates separate versions of your site’s cache and optimizations just for mobile devices. Useful for sites with very different mobile layouts or separate mobile menus. I’ve left it OFF for now since my layout is responsive and shared across devices. If your site has mobile-specific scripts or layouts, you might consider turning it ON. |
| Cache for Logged-In Users by Role | ❌ Disabled | Caching for logged-in users (like editors or admins) is typically unnecessary and can cause confusion while editing content. Best to leave this OFF unless you’re running a membership or LMS site. |
| Auto-refresh Cache | ❌ Disabled | This auto-clears and rebuilds the cache on a timer. While useful for news sites or content-heavy blogs, I prefer refreshing manually using the “Preload Cache” button when needed. |
Advanced Caching
These settings give you more control — mostly for special scenarios.
| Setting | Purpose |
|---|---|
| Exclude Pages from Cache | Leave it default |
| Separate Cache for Query Parameters | Leave it default |
| Bypass Cache for Cookies | Leave it default |
📌 Pro Tip: FlyingPress gives you “Edit exclusions” or “Edit parameters” buttons right next to each option. Super handy if you want to fine-tune things.
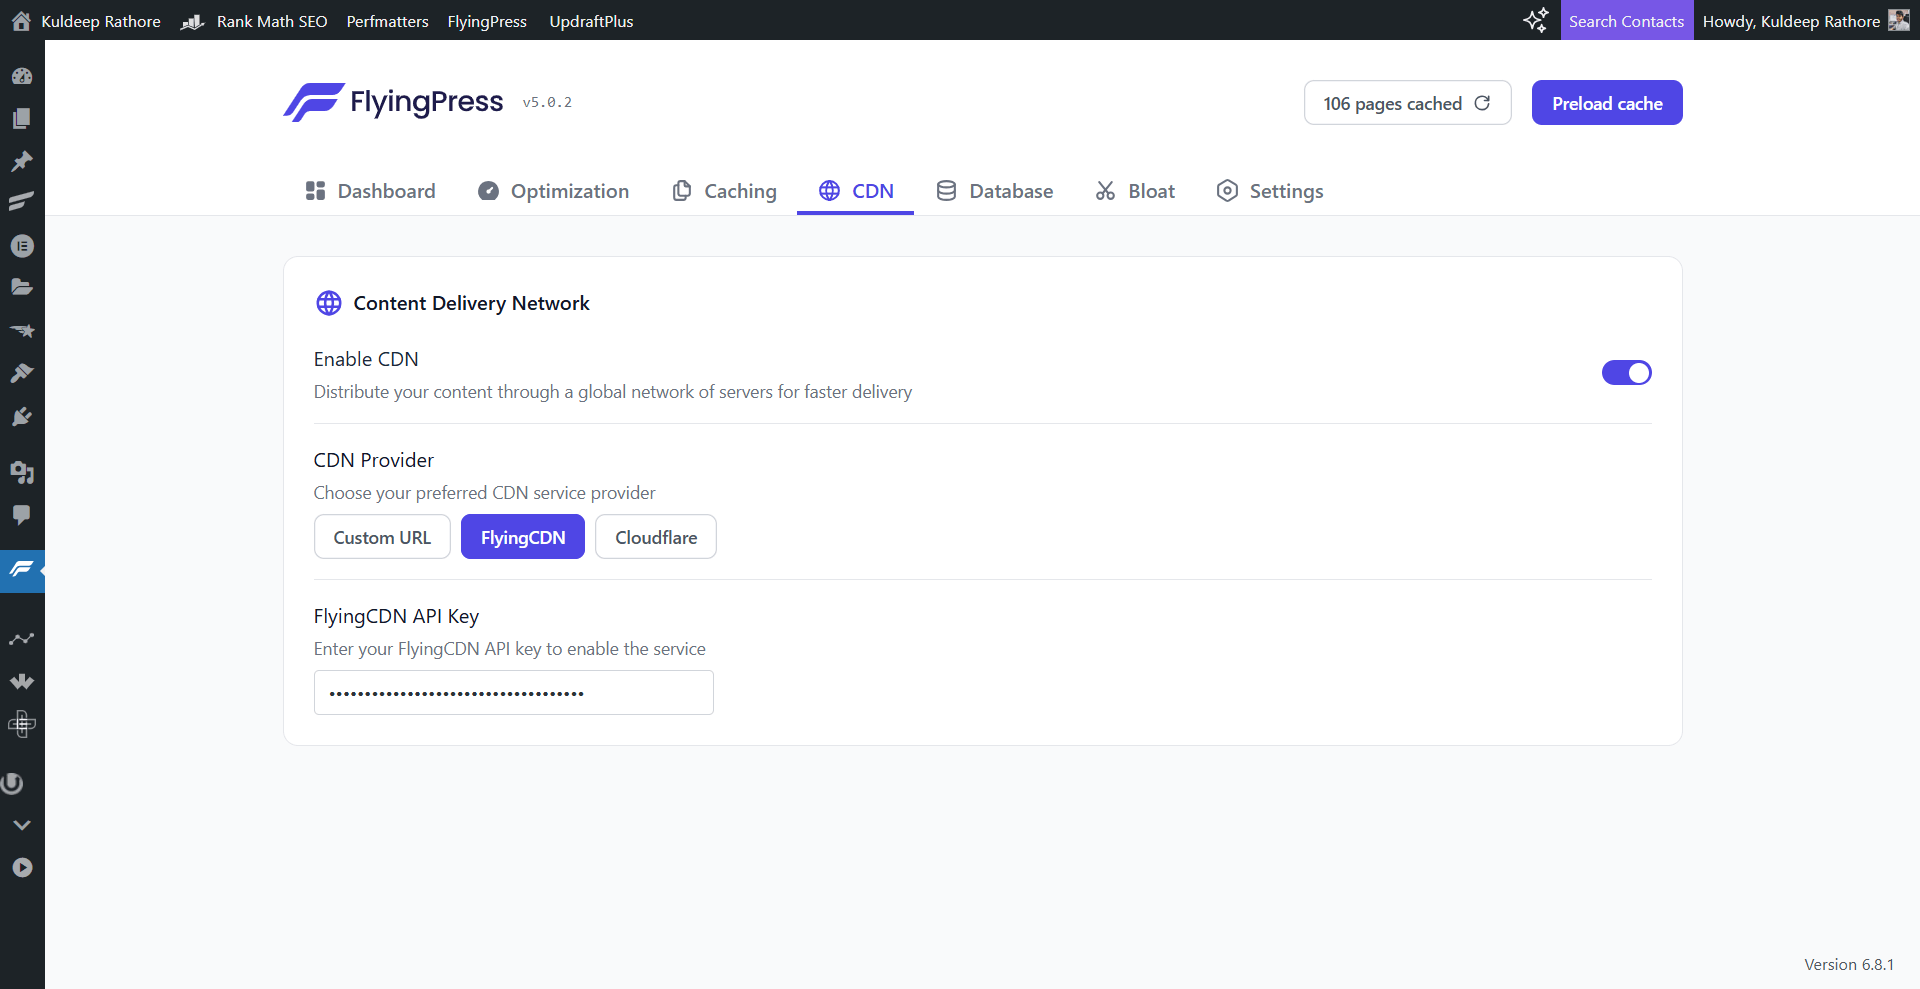
CDN Settings – My FlyingPress Setup with FlyingCDN
I’ve enabled CDN in FlyingPress and I’m personally using their own service – FlyingCDN: which is built on top of Cloudflare Enterprise. It’s a paid add-on ($5/mo), but one I feel is totally worth it.
Here’s what it does in simple terms:
- Your CSS, JS, images, and other static files are served via a global network (CDN), which reduces load times for users across the world.
- It also helps reduce server load and improves TTFB (Time to First Byte), which directly impacts your Core Web Vitals — especially Largest Contentful Paint (LCP).
Why FlyingCDN?
FlyingCDN uses Cloudflare Enterprise — which gives you access to premium features like:
- Argo Smart Routing (improves TTFB by routing traffic through faster paths)
- Tiered Cache
- Cloudflare Polish + Mirage (image optimization handled at the edge — not by your server)
- Enterprise firewall & security
- Easy integration with FlyingPress
These are features that regular free Cloudflare plans don’t offer.
My Current Settings:
- CDN Enabled
- Provider: FlyingCDN
- API key added in settings (auto handles the setup behind the scenes)
Once it’s active, FlyingPress will automatically start delivering your static assets via CDN — no advanced config needed unless you want to use a custom CDN URL.
You can also use:
- BunnyCDN (fast & budget-friendly)
- Cloudflare (free plan works but lacks advanced routing and image optimizations)
📌 Pro Tip: Once set up, check your page source and make sure your CSS, JS, and image URLs are being served via the CDN domain. You can also purge and preload from the FlyingPress dashboard if needed.
Database Settings – Clean, Lean & Automatic
Over time, your WordPress database collects all kinds of unnecessary data — old post revisions, spam comments, auto-saved drafts, etc. Cleaning it up regularly can improve your site’s performance, reduce server load, and even prevent database-related slowdowns.
FlyingPress makes this easy with an automated cleanup option.
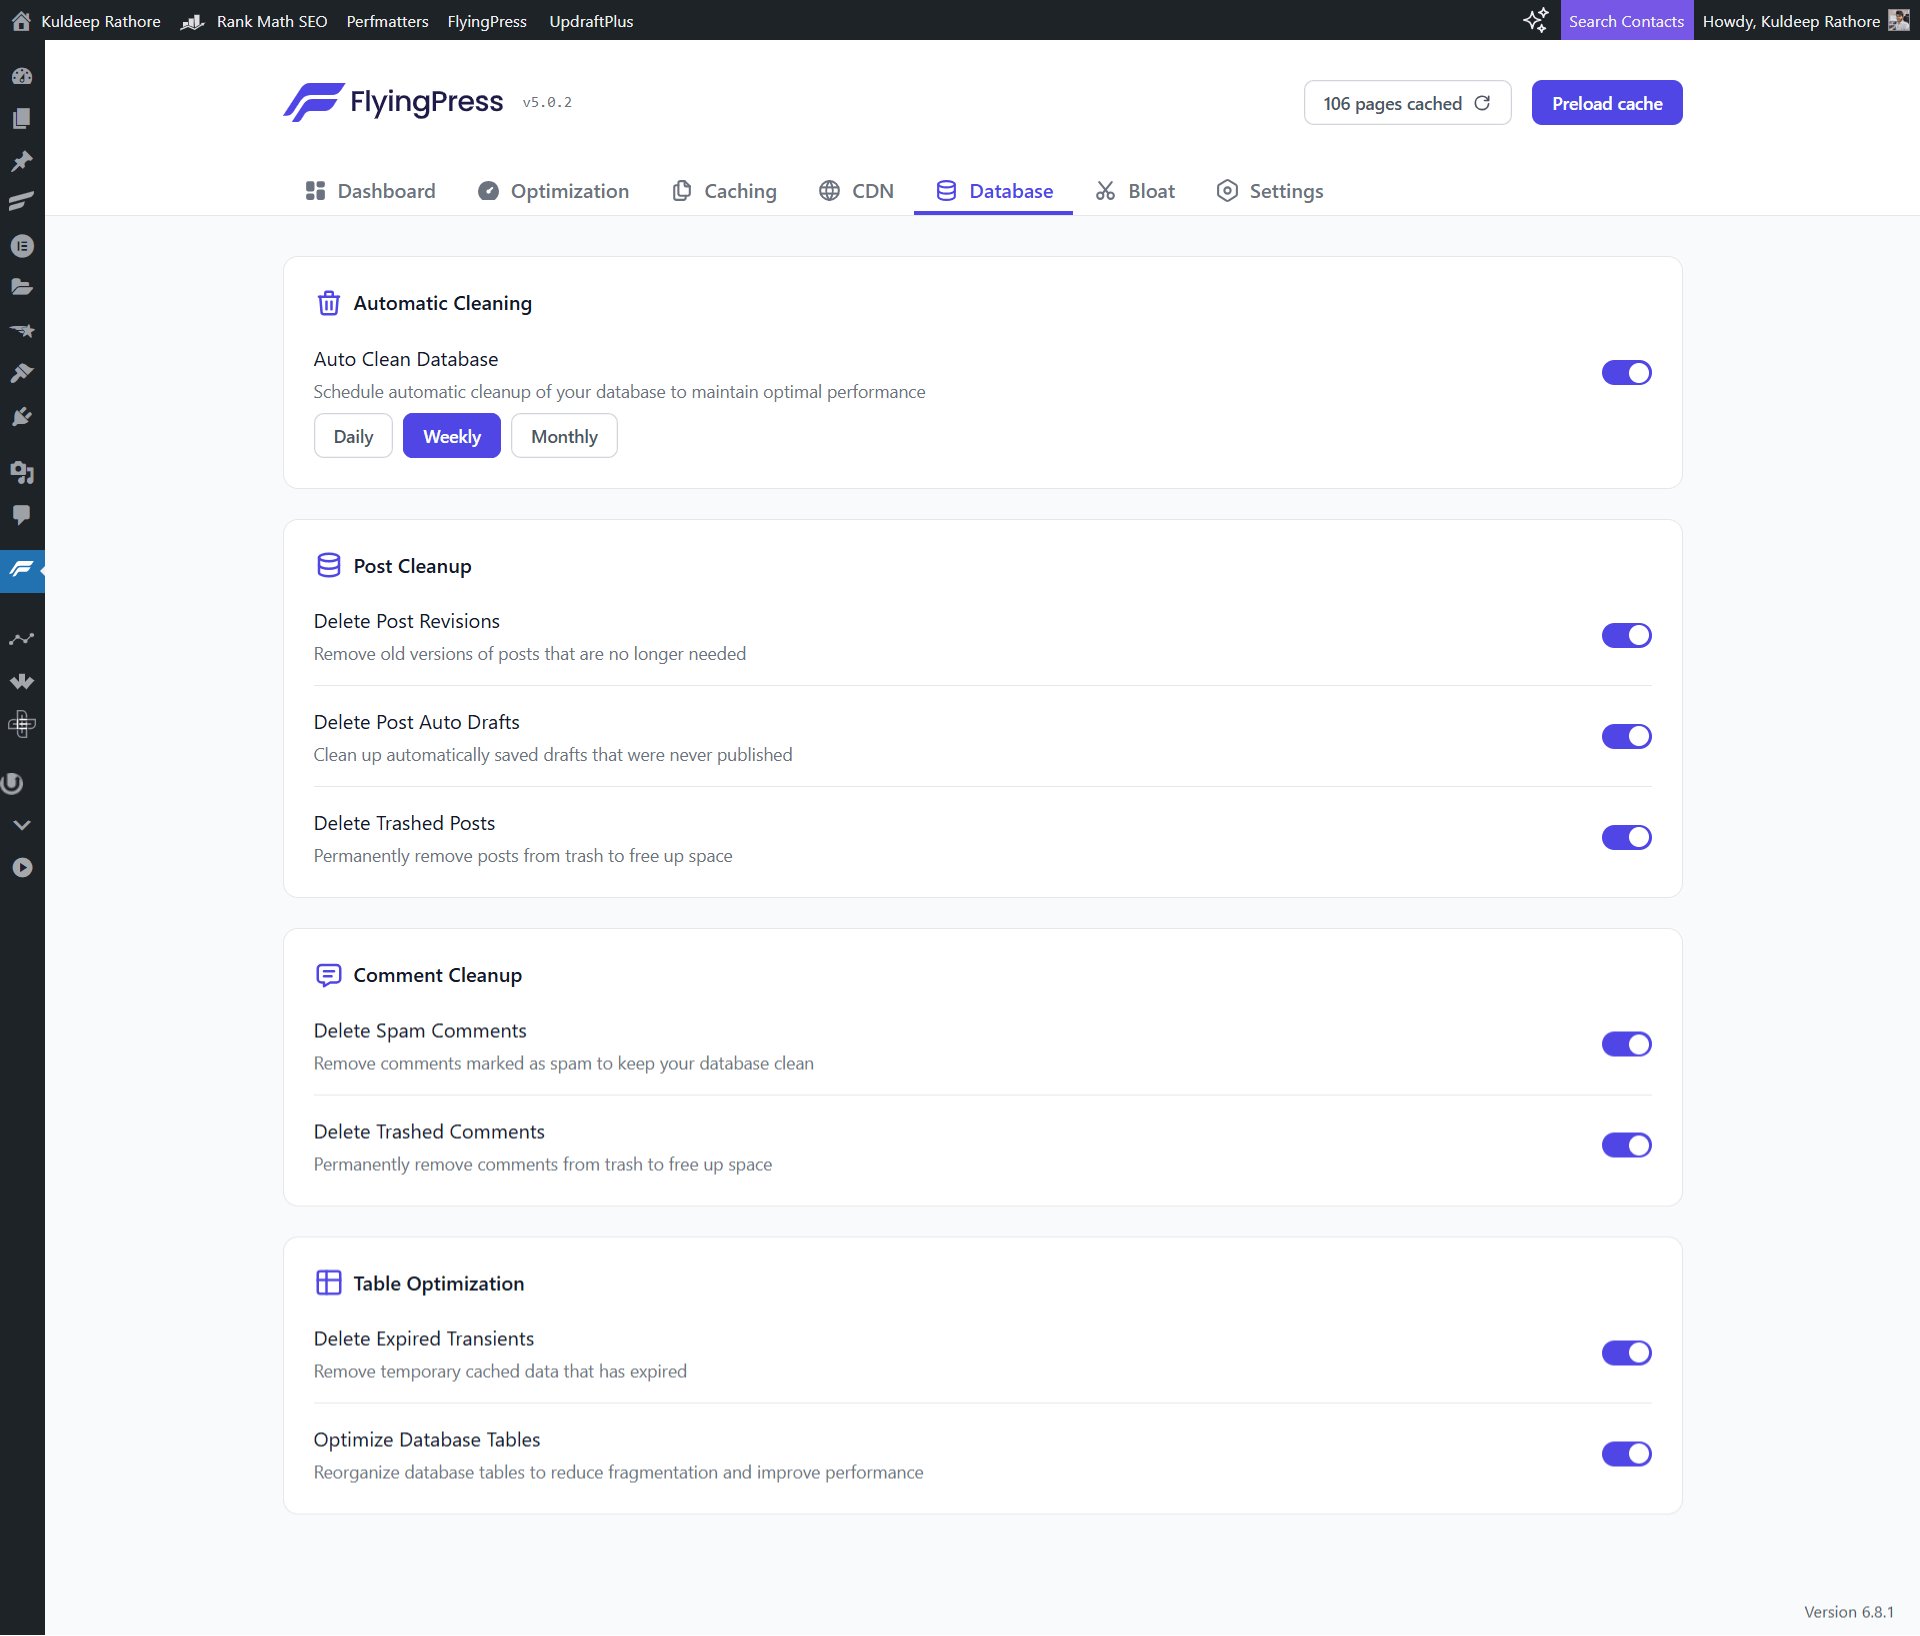
My Setup: Weekly Auto-Clean
I’ve set the “Auto Clean Database” feature to run on a weekly basis — which I’ve found to be a safe middle ground.
Depending on your site, you could also go for:
- Daily (for news or high-publishing blogs)
- Monthly (for low-activity sites)
Cleanup Options I’ve Enabled:
Here’s what I’ve personally turned ON — and you probably should too:
| Section | Option | Status | Why I Use It |
|---|---|---|---|
| Post Cleanup | Delete Post Revisions | ✅ On | Removes old versions of your content you’ll probably never need again. |
| Post Cleanup | Delete Auto Drafts | ✅ On | Gets rid of drafts saved in the background (from the editor) that were never published. |
| Post Cleanup | Delete Trashed Posts | ✅ On | Cleans out your trash bin permanently. |
| Comment Cleanup | Delete Spam Comments | ✅ On | Empties spam folder — great for keeping things tidy. |
| Comment Cleanup | Delete Trashed Comments | ✅ On | Same idea — empties deleted comments. |
| Table Optimization | Delete Expired Transients | ✅ On | Removes temporary cache data that’s already expired. |
| Table Optimization | Optimize Database Tables | ✅ On | Reorganizes DB tables for better efficiency and reduced fragmentation. |
💡Quick Tip: These settings are totally safe to use — FlyingPress doesn’t touch published posts or approved comments. Just old junk that slows things down behind the scenes.
Bloat Settings – Keep It Clean (But Not at the Cost of Functionality)
WordPress loads a bunch of scripts and services that many sites don’t actually use. The Bloat tab in FlyingPress helps you disable those extras and reduce page weight.
Here’s how I’ve configured it — with a focus on performance without breaking things:
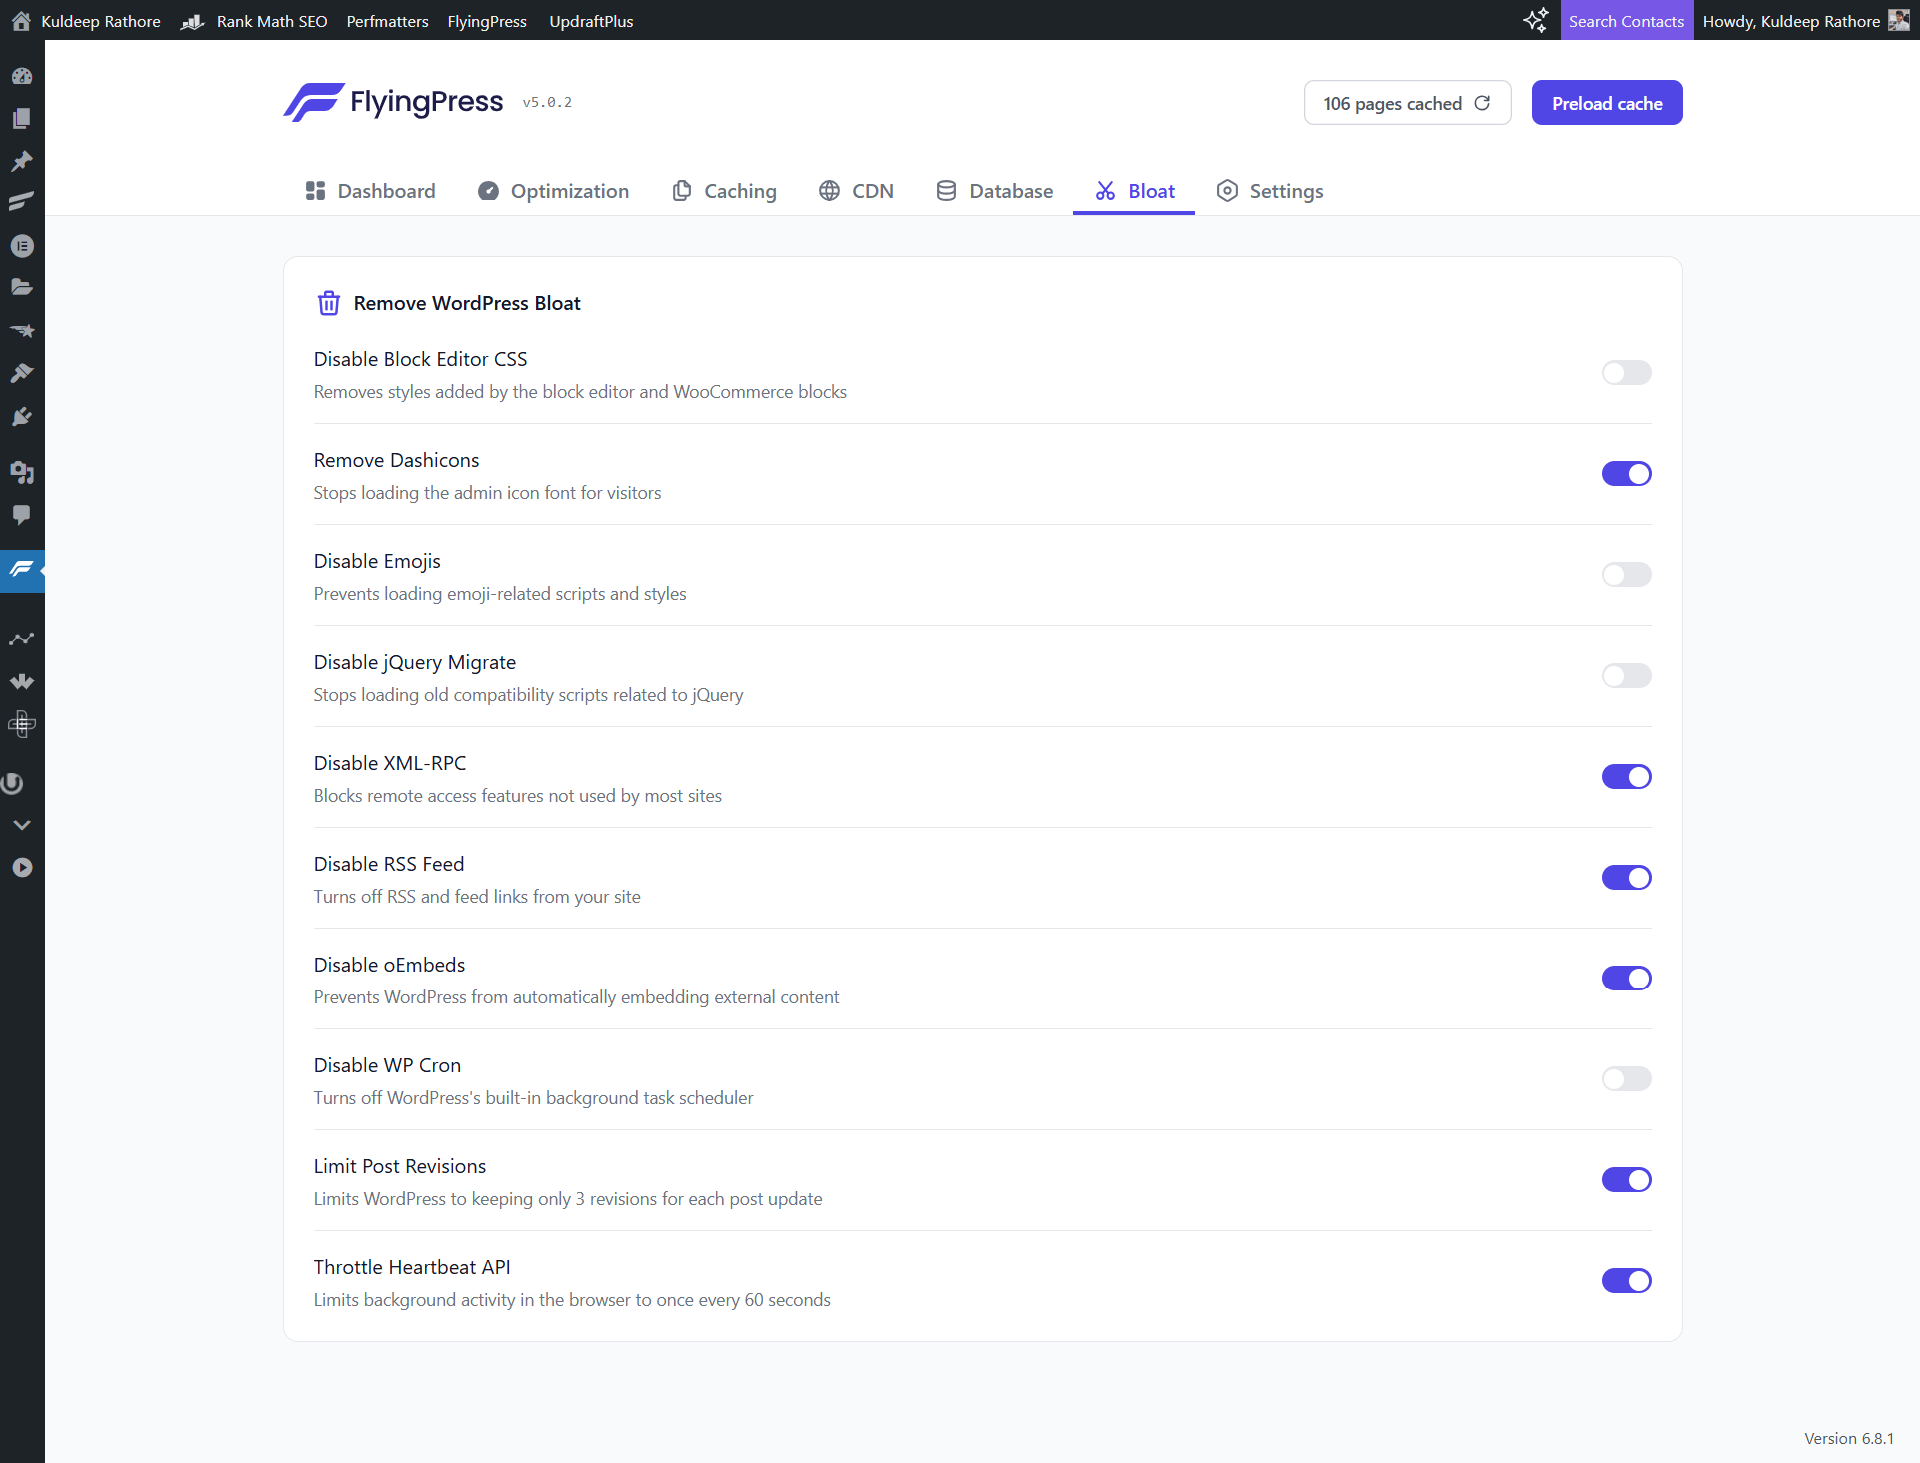
My Current Setup & Explanations
| Setting | Status | Why I’ve Set It This Way |
|---|---|---|
| Disable Block Editor CSS | ❌ Off | I use the block editor occasionally (and WooCommerce on some projects), so I leave this ON to avoid design issues. |
| Remove Dashicons | ✅ On | These are backend icons — no reason to load them on the front-end unless you’re using a page builder widget that depends on them (rare). |
| Disable Emojis | ❌ Off | I actually use emojis in my content 🙃 — and I like how they add personality, so I’ve left this OFF. If you don’t use emojis, feel free to disable this. |
| Disable jQuery Migrate | ❌ Off | This helps older plugins/themes continue to function. I prefer to keep it ON unless I’m 100% sure my site doesn’t depend on it. Disabling it can break sliders, lightboxes, or older themes. You can test this with Health Check or browser console if you want to experiment. |
| Disable XML-RPC | ✅ On | This is almost never used unless you’re connecting to WordPress via remote publishing tools (which I’m not). Safe to disable. |
| Disable RSS Feed | ✅ On | I don’t rely on RSS for content delivery, and this also stops content scraping bots. If you use FeedBurner or similar, leave this OFF. |
| Disable oEmbeds | ✅ On | Prevents WordPress from automatically embedding things like YouTube/Twitter just by pasting a URL. I embed manually, so it’s safe for me. Your choice here may vary. |
| Disable WP Cron | ❌ Off | WordPress Cron runs background tasks like scheduling posts and plugin updates. Disabling this requires setting up a real cron job on the server — which I haven’t done here. Unless you’re managing your own server, it’s best to leave this OFF. |
| Limit Post Revisions | ✅ On | Keeps only the last 3 versions of each post. Helps reduce database bloat. |
| Throttle Heartbeat API | ✅ On | Reduces how often the browser talks to the server while you’re editing posts. Helps save server resources without affecting your experience. |
Summary:
- I’ve disabled the stuff I know I don’t use
- I’ve left potentially risky ones (like jQuery Migrate and WP Cron) enabled — because breaking your site isn’t worth a minor gain
- You can always test each setting on a staging site if you want to get more aggressive
Settings Tab – Import/Export Config & More
The Settings tab in FlyingPress isn’t where you tweak performance — but it’s super useful when managing multiple sites or backing up your config.
Here’s what you’ll find inside:
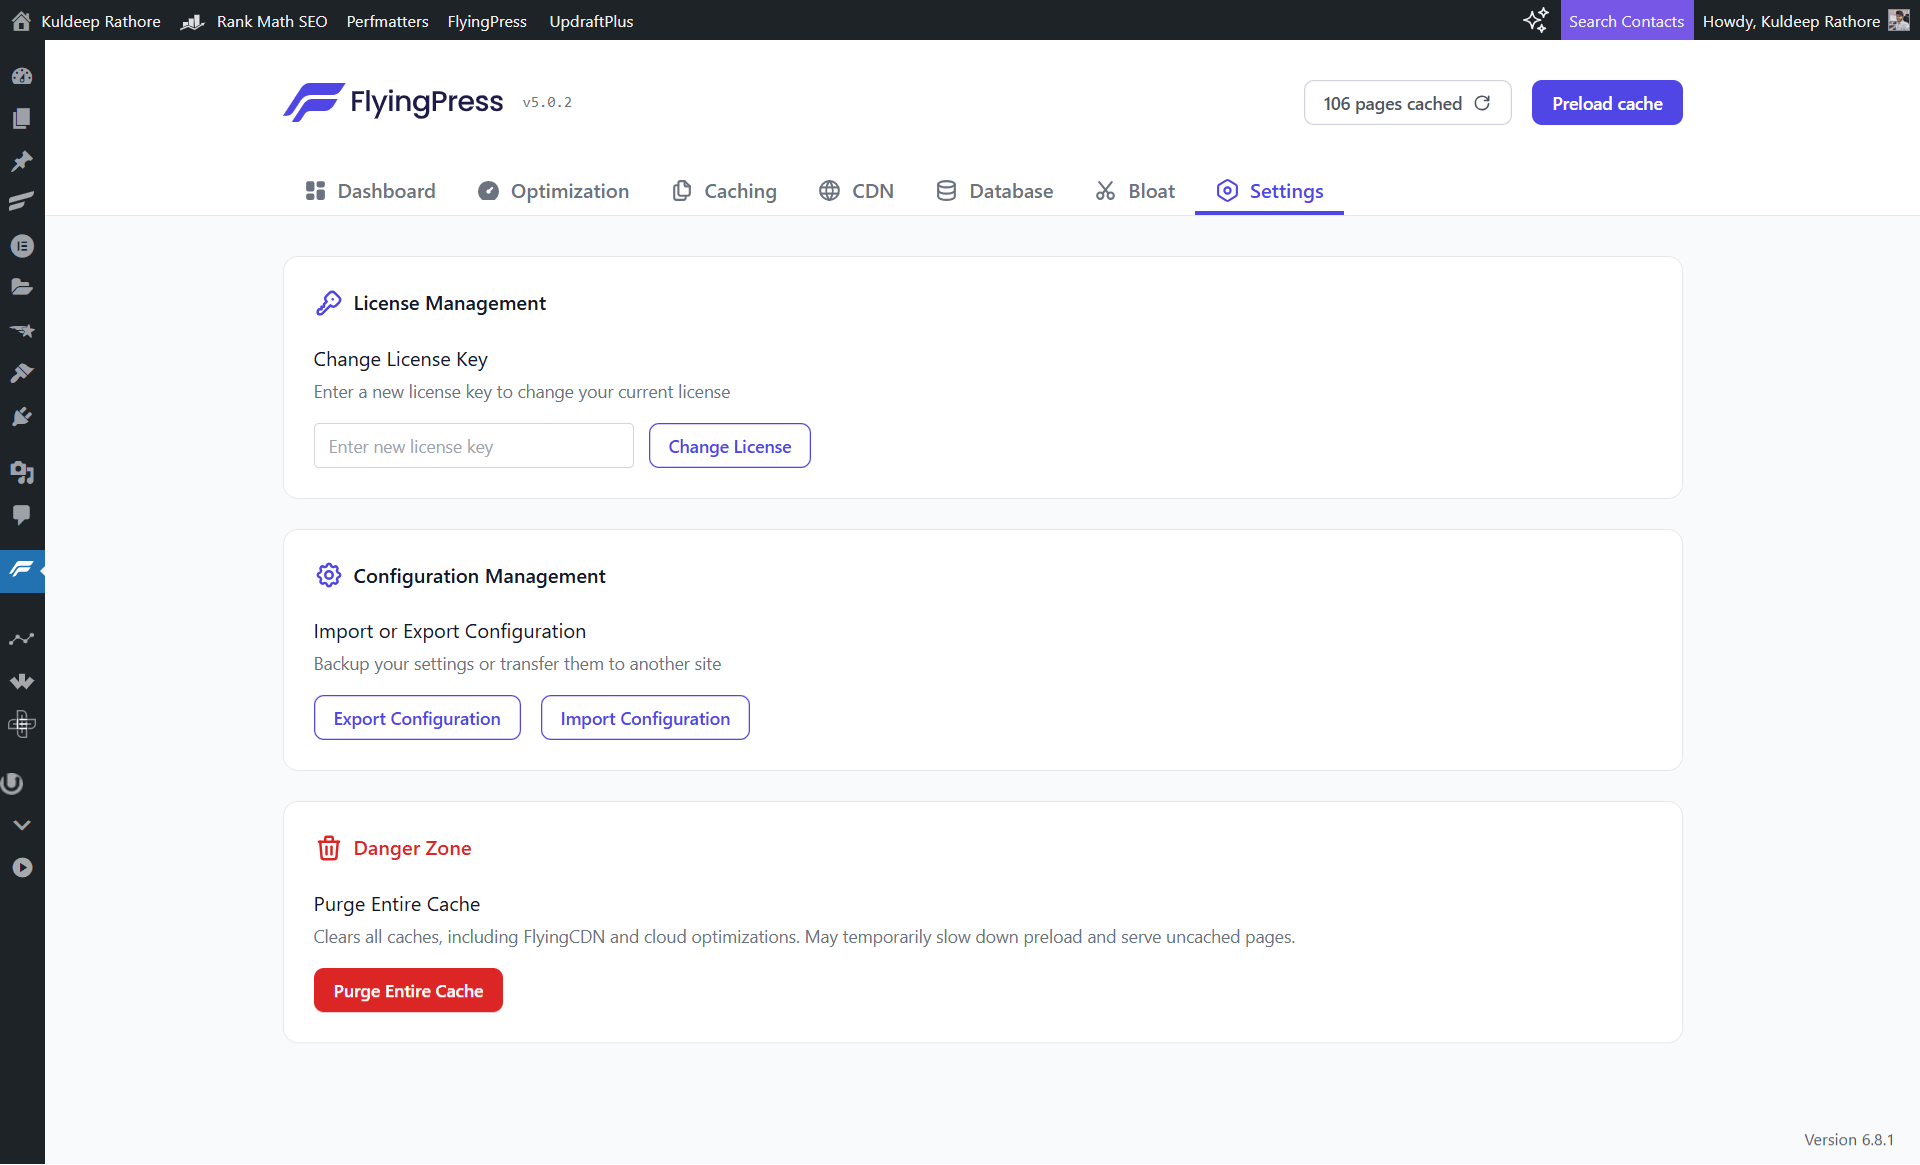
Import/Export Configuration (Highly Useful)
FlyingPress gives you a way to quickly export your entire setup as a .json file — and just as easily import it on another site.
This is especially helpful if:
- You manage multiple WordPress installs
- You’re setting up staging and live environments
- You just want to share your config with a friend (or reader!)
You can grab my full configuration and apply it instantly:
👉 Download My FlyingPress Settings (JSON File)
To use it:
- Go to FlyingPress > Settings > Configuration Management
- Click on Import Configuration > Upload the file
- Click Save & done.
💡 Pro Tip: Always export your config before making major changes. It’s a great backup to fall back on.
Purge Entire Cache (Use When Needed)
You’ll also find a red “Purge Entire Cache” button under the “Danger Zone” label.
This clears:
- FlyingPress’s cache
- CDN-level cached files (if you’re using FlyingCDN)
- Any optimization rules already applied
Use it when:
- You’ve changed themes or plugins
- You’ve updated core content and it’s not showing up
- You’re troubleshooting something cache-related
That’s it for the Settings tab.
Nothing you need to mess with here daily — but it’s good to know these options exist when you need them.
Behind the Plugin – Meet Gijo Varghese
One of the reasons FlyingPress stands out from the crowd is the person behind it — Gijo Varghese.
He’s not just a developer, he’s a hands-on performance enthusiast who actually understands what WordPress users deal with. From building FlyingPress to actively helping users in his Facebook group and beyond, he’s constantly improving the plugin based on real-world feedback.
If you haven’t already, I highly recommend joining the official FlyingPress Facebook group where Gijo and the community share optimization tips, updates, and practical fixes. It’s one of the few product communities that actually adds value.
FAQ | FlyingPress Settings & v5
What are the best FlyingPress settings for Elementor users?
If you're using Elementor or other page builders, avoid aggressive options like “Remove Unused CSS” unless you're ready to test carefully. Instead, enable lazy loading, delay JavaScript, and use a good CDN like FlyingCDN for speed without breaking your layout.
Should I enable “Remove Unused CSS” in FlyingPress?
It depends on your setup. I personally keep it off because it sometimes breaks layouts. You can try enabling it and see how your site behaves. Use the “Edit Exclusions” button if anything looks off.
What’s the difference between FlyingCDN and Cloudflare?
FlyingCDN is built on top of Cloudflare Enterprise. It offers premium features like Argo Smart Routing, Tiered Cache, and image optimization (Polish & Mirage) — things you don’t get with the free Cloudflare plan.
How do I import FlyingPress settings?
Just go to FlyingPress → Settings → Import Configuration, upload the .json file, and click save. It’ll apply all the settings in one go.
Is FlyingPress better than WP Rocket or LiteSpeed Cache?
FlyingPress offers excellent performance with a clean UI and great support. WP Rocket is good, but FlyingPress often has deeper controls. LiteSpeed Cache is fantastic too, but best used on LiteSpeed servers & FlyingPress does the job for almost all of the servers. Based on personal experience, yes, flyingpress is better than WP Rocket & LiteSpeed Cache.
Final Thoughts
At the end of the day, performance is important — but so is your website’s identity and design. You don’t need to sacrifice creativity just to shave off a few milliseconds.
FlyingPress v5 makes it super easy to boost speed without diving deep into developer stuff. Whether you’re a blogger, small business owner, or web designer using Elementor, you’ll get great results with the right configuration.
I hope this guide helped simplify things for you.
If you want to explore more:
- Join the FlyingPress Facebook Community
- Follow creators like WPJohnny or OnlineMediaMasters for deeper performance tips
And if you liked this guide, feel free to download my config and implement it on your site in seconds.
Happy optimizing!
Cheers,
Kuldeep – Your Elementor & WordPress Guy

About the Author
Kuldeep Rathore is a WordPress & Elementor expert and co-founder of 60Pixel. With 3+ years of hands-on experience, he builds fast, SEO-optimized websites for creators and small businesses. Through this blog, he shares practical tutorials and tips trusted by the WordPress community worldwide.