Gone are the days when it would take hours & hours to build a WordPress website. This is the AI era & with new-age tools like Kadence AI, you can build a WordPress site in just minutes.
I’ll show you how to use Kadence AI to build a WordPress website in under 30 minutes.
In this Kadence AI tutorial; you’ll get to know…
So no more chitter-chatter, let’s dive in…
What do you need to use Kadence AI?
Before proceeding further, here’s a quick reminder on what you’ll need in order to use the Kadence AI…
- Kadence Theme
- Kadence Blocks
- Kadence Starter Templates
Along with these 3, if it's your first time using Kadence AI, I suggest you use testing or a staging site to learn your way around it & give it a try.
Quick Note: I use Cloudways hosting & this is one of the best WordPress hosting with additional features such as creating a staging site and a demo site without additional costs.
If you’re interested, you can check this detailed guide from Cloudways.
Get Prerequisites – Install Theme & AI Starter Templates Plugin
Whether you’re trying on a test site or a new one, you’ll need to install the following theme & a couple of plugins…
To install the Kadence Theme, inside your WordPress dashboard,
Simply go to Appearance > Themes.
Next up, Click Add on Add New, type “Kadence” in the search bar & click on Install.
Once done, Activate the theme.
Once the theme part is done, get the plugins…
- Go to Plugins > Add New
- Search for Kadence in the search box
- Install Kadence Blocks, Kadence Starter Templates
- Once installed, Activate both of the plugins
Activate Kadence AI & Connect to your KadenceWP Account
As you install Kadence Blocks, a new item “Kadence” will be added to your WordPress admin menu, and similarly, after the installation of Kadence Starter Templates, a new “Starter Templates” item will be added under the Kadence.
To Activate Kadence AI…
- Go to Kadence > Starter Templates in your WP Admin
- Click on “Activate Kadence AI Starter Templates”
Once you click on the button, Kadence will redirect you to the KadenceWP account login page where you’ll need to log in & connect your account.
On the login page, simply enter your details & Login into your account (or register and create a free account) and then select Connect to proceed.
Clicking on the Connet button will connect your site with the Kadence AI credit system & you’ll now be able to use it on your site.
Talking about the Kadence AI’s credit system,
- Free users get 250 Lifetime AI credits
- Paid users get 4000 to 16000 AI credits (based on subscription plan)
To understand the credit system better, how it works, and the best Kadence AI pricing plans, read my detailed Kadence AI review where I’ve explained everything you need to know about Kadence AI.
If you’re short on time & just want to know the best Kadence AI pricing plan where you get the best value for money, then simply grab the Kadence Full bundle yearly plan.
With this plan, you get all the pro features and 8000 AI credits.
Now that the installation & activation part is done, let’s dive in and let’s get on to how to use Kadence AI.
Kadence AI Tutorial – Building a WordPress website in under 30 mins
Once you connect your website to your Kadence account, Kadence redirects you back to your WordPress dashboard inside the Kadence AI Setup Wizard.
Now, building a website using Kadence AI is a 5-step process or rather phases and it doesn’t take too long.
Building an AI-powered site using Kadence AI in 5 phases…
- Phase 1: Input Phase
- Phase 2: Generation Phase
- Phase 3: Refinement Phase
- Phase 4: Launching Phase
- Phase 5: Further Customization
Each phase contains a few steps & they are super duper easy.
Let’s get started with the first one…
Phase 1 | Input Phase
Step 1 – Provide Business details in the Kadence AI wizard
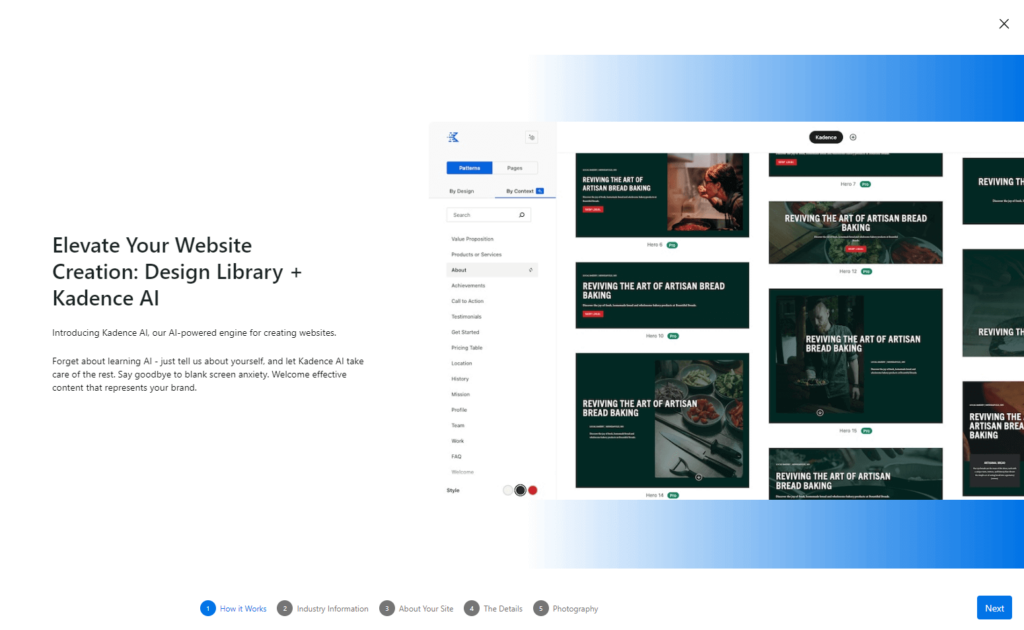
The first step in the Kadence AI wizard gives you a quick overview of the 5-step process & how it works. To proceed further, Click Next.
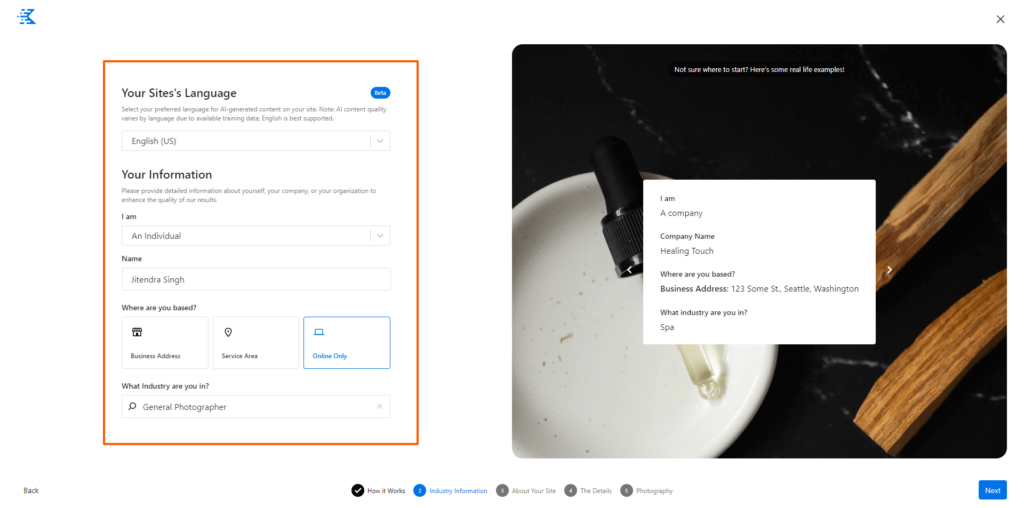
Now comes the key part – providing details about your business to help Kadence AI generate a relevant site.
Here, you need to enter information about your business – business name, who you are, and what industry you’re in.
For example, I’m creating a website for my cousin – Jitendra who is skilled in photography & videography.
Here, you need to provide these 5 basic details…
- Your Site Language: English (US)
- Entity (I am): An Individual, a company, or an organization
- Name/Business Name: Your Name or Company Name
- Business Type: Business Address, Service Area, or Online only
- The industry you’re in: The name says it all
Here are the details for my cousin's photography website…
Once you’ve provided basic details of your business, click on the Next button at the bottom-right to proceed & describe your business.
Step 2 – Describe your Business
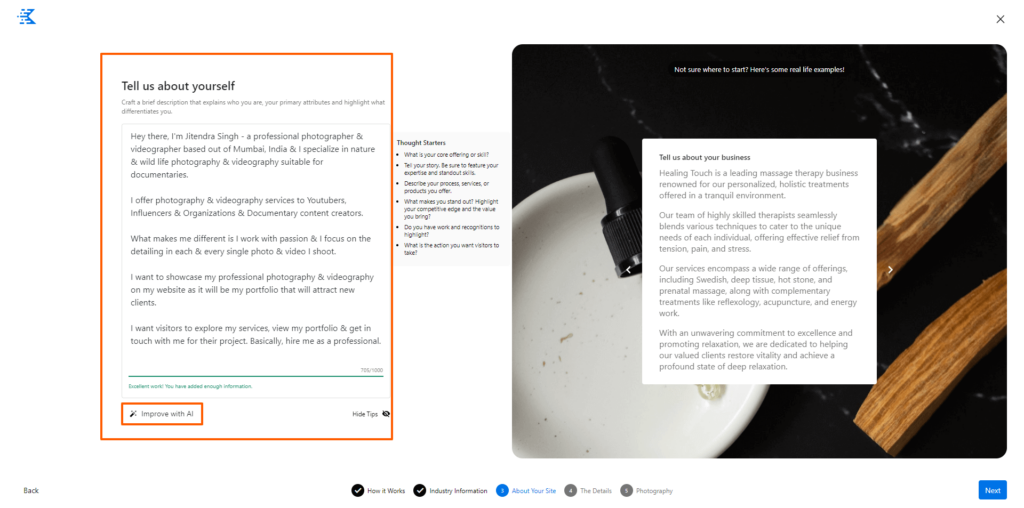
In this step, you need to describe what your business is so that the AI can understand better & create relevant content.
Simply put,
- what you do i.e the core offerings of your business,
- what makes you unique
- the products or services you offer
- your team, your story, or your brand story,
- business statistics, value proposition, etc,
Also, let the AI know what action you want the visitors to take on your website.
To get more clarity, you can click on the Show Tips button.
Even if you just enter basic details, click on the “Improve with AI” button to improve your business description.
Just for demo purposes, here’s what I provided for the photography site…
Step 3 – Populate your Business Keywords
In this step, you simply need to add keywords that resonate with your business and target audience and also, select a tone to reflect your writing style. It’s important as Kadence AI will use these inputs to generate content for your website.
If you’ve no idea, the suggested keywords will work fine. So select keywords suggested by Kadence AI & once you get an idea, add your keywords.
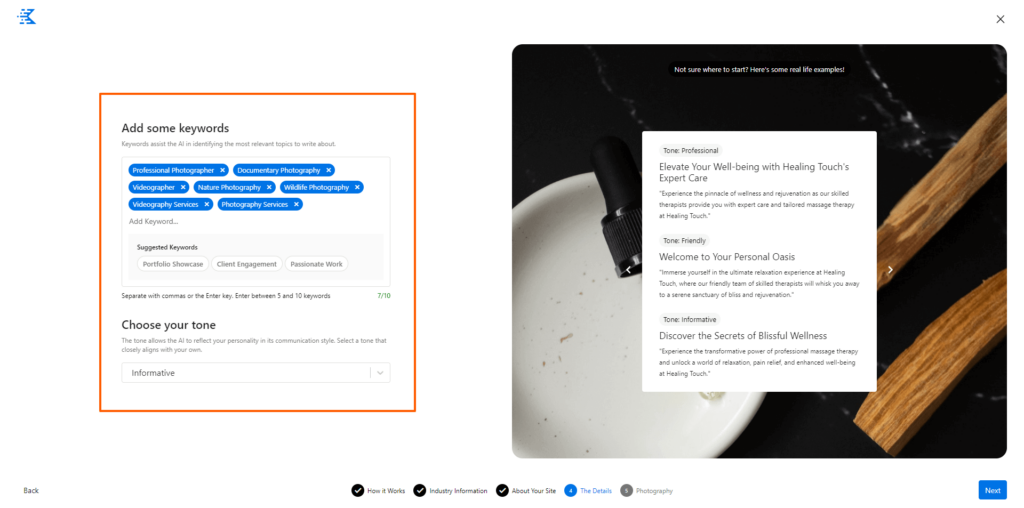
Once done, from the dropdown, select a preferred communication tone that will appeal to your target audience.
Once done, Click Next to get to the final step of Phase 1.
Step 4 – Business Images & Photography
Based on your business description, industry & keywords, Kadence AI searches & creates a collection of royalty-free Images (from pexels library) for your website.
These images are showcased in two sections: Featured Images & Background Images.
The collection is likely to be business but if you don’t like the image collection then you can get more relevant images for your business.
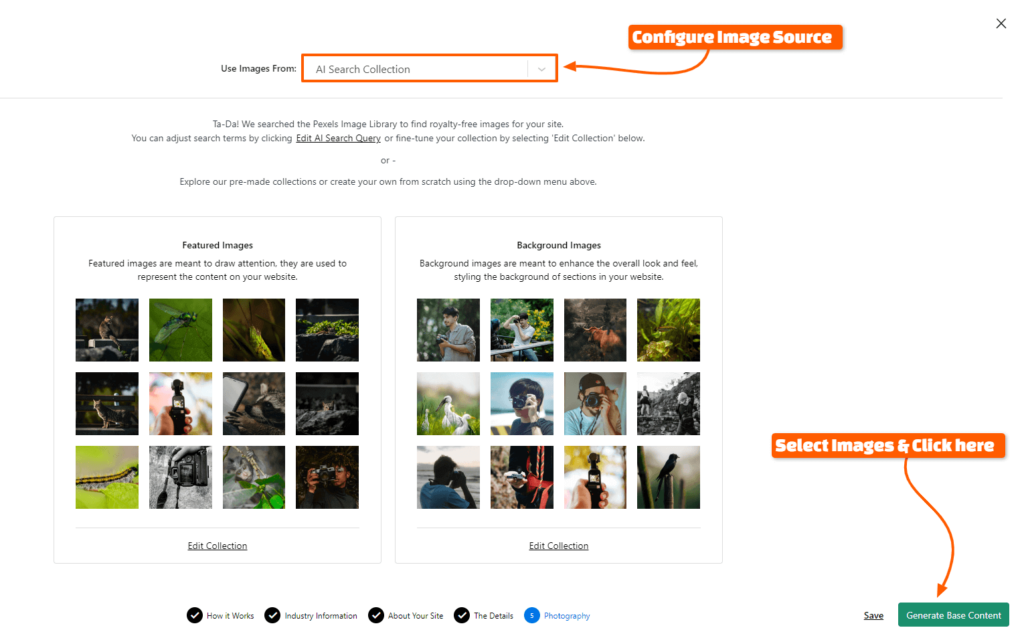
You can either edit the collection or adjust image search terms by Editing the AI Search query & modifying the keywords to get a better image collection.
There are a lot of image categories that Kadence offers. You can see that the Kadence AI uses the “AI Search Collection” by default.
But you’re not restricted to that only as you can select your own images from your WordPress media gallery.
Once you’ve created your image collections, click the Generate Base Content button at the bottom right to have Kadence AI generate your website design and content.
Phase 2 | Generation Phase
Based on all your inputs, right from the business description, and keywords to images, Kadence AI will probably take a minute to generate base content for your site. So sit back & take a deep breath.
Once done, you’re ready to dive into fine-tuning your site i.e. refinement phase.
Phase 3 | Refinement Phase
Step 1 – Choose AI-generated Starter Templates
Once the Kadence AI is done with generating the base content for your website, it takes you to the screen where you get to choose AI-generated Starter Templates.
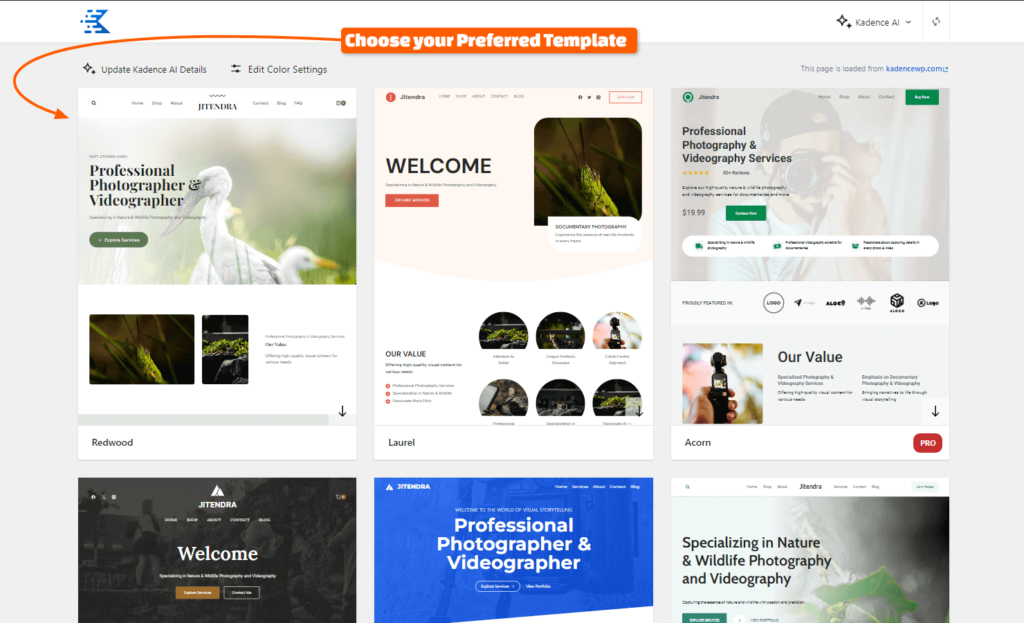
With over 6 different starter templates that Kadence AI provides, choose the one you like the most & click on it to customize it.
Step 2 – Customize Style (Fonts & Colors)
Selecting any of the templates opens a 3-step import wizard that allows you to customize its styling, content & plugins installed with the started template. It’s pretty plain & simple.
The first one is Style Starter where you can customize the colors and fonts of your site.
You get the customizer on the left-hand side & there’s a live preview on the right-hand side which allows you to see all the changes in real time.
Let’s customize our site color first.
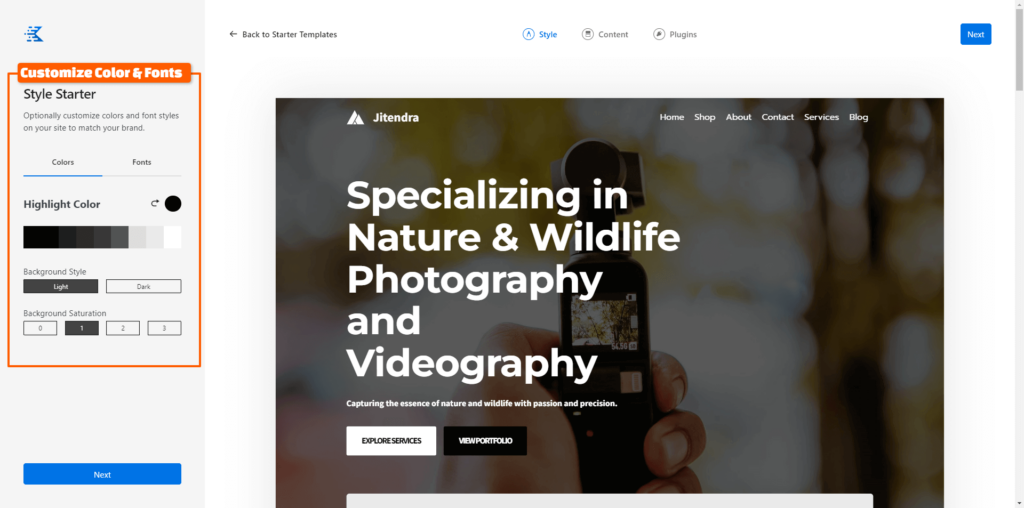
Click the empty swatch next to Highlight Color (Base color) and pick any one color for your website. I’ve chosen a black shade for this demo site.
The good thing here is that Kadence AI will use that as a base color and generate a color palette for your site so that you don’t have to manually create a design system.
Further, you can adjust the color, set the Background Style to Light or Dark, and even play around with the color saturation levels.
Once you’re done with the colors, navigate to the fonts tab & just pick any one font-pairing for your site.
When you’re happy with your font & color pairing for the site, click on the Next button to import content for your site.
Step 3 – Choose Content to Import
This step won’t require much explanation as the title says it all. Anyway, just for your convenience, let me put it down.
On the left-hand side, you can see the content settings where you’re asked whether or not to import blog posts & settings.
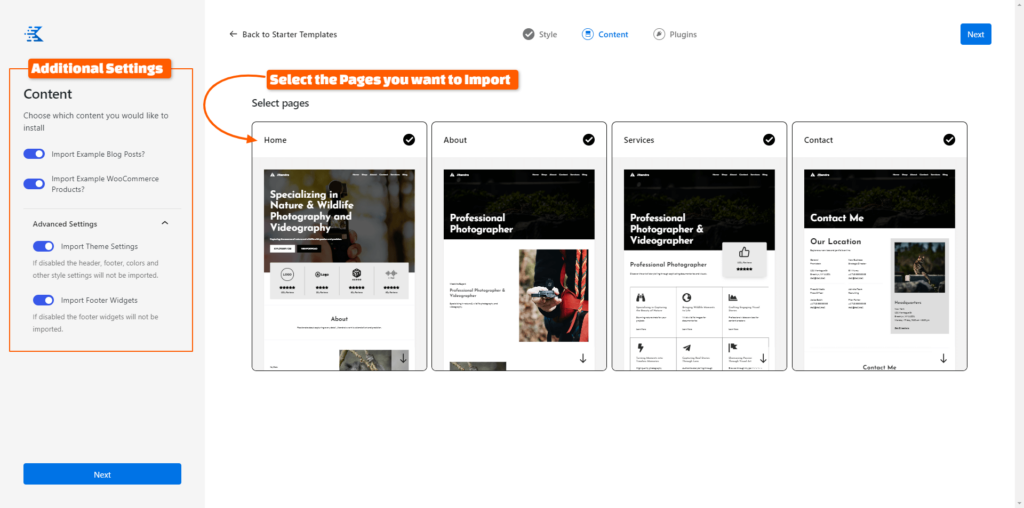
By default, Kadence AI will import example pages, blog posts, WooCommerce products, footer widgets, and theme settings.
But you toggle on-off & select only the one you want to import.
For instance, if you don’t want the footer widgets, deactivate the Import Footer Widgets toggle.
Similarly, you can deselect pages (about, services, contact) to import from the main preview window on the right-hand side.
Once you’ve selected everything you want to import, click Next to go to the final step of the Kadence AI template import process.
Step 4 – Finalize Plugins to Finish & Launch the Site
The final step is to just select the plugins you need.
Kadence AI suggests all the plugins you should install for your site. It checks all required plugins by default and allows you to select optional ones like Ordrable, GiveWP, Event Tickets, etc (which all are sister brands of KadenceWP) before proceeding.
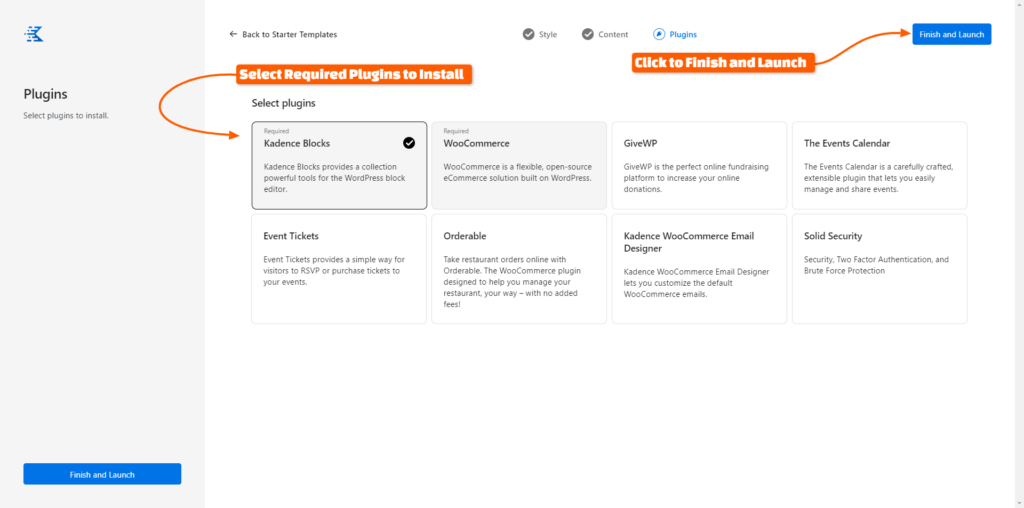
It’s nothing but a marketing tactic but as all of the suggested plugins are free to use, it’s a good marketing tactic.
Select the ones you need and click Finish and Launch to import the AI-generated template.
Phase 4 | Launch
As you click on the finish & launch button, Kadence AI will start importing all the designs, content & plugins.
This import process takes about a minute.
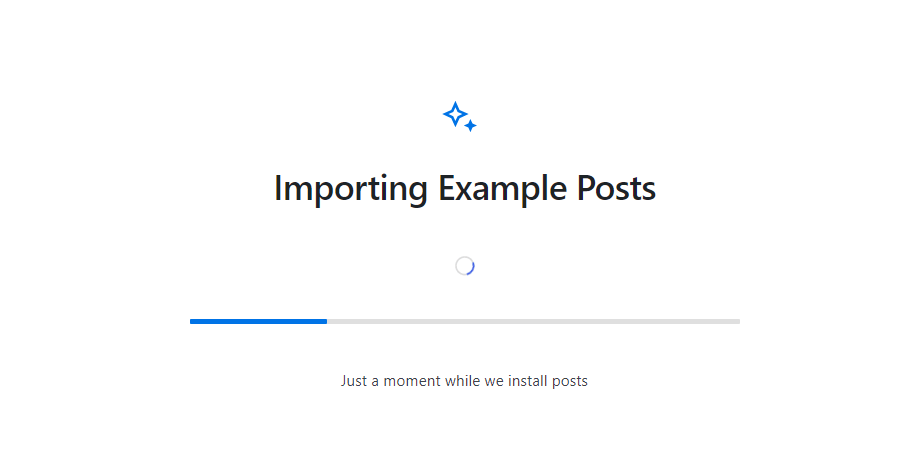
Once the import process is completed, you’ll have a ready-to-launch website with pages, products (if applicable), and AI-generated content.
Next up, you’ll see this screen…
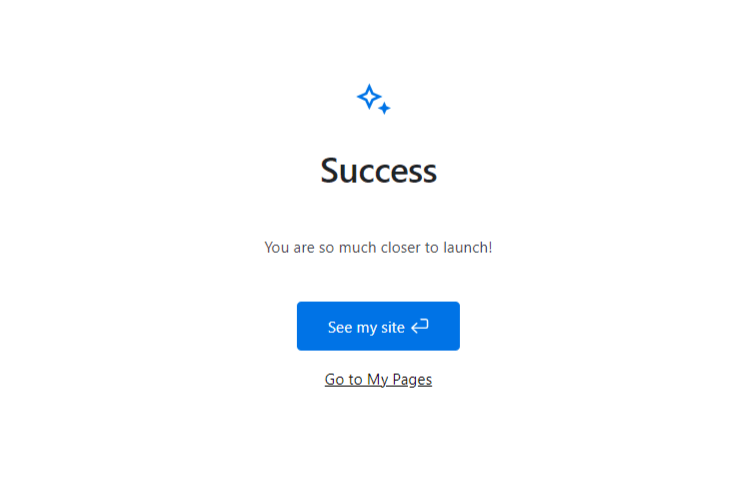
From installing Kadence plugins, providing details, and image selection to generating and importing your site, this entire process takes you less than 30 minutes to complete. Seriously, building a WordPress website doesn’t get any easier than that!
Once you’ve launched the site, you could go live immediately, you’d still have a better-looking website than some of your competitors.
If you’re a quick mover, you can go with the first edition of the website but I’d recommend you spend just a little more time editing the AI-generated content before going live.
The best part is that you won’t have to do it all manually as Kadence AI is also integrated into the block editor, which will speed up those tasks too.
Let me show you how & now we are into the phase 5.
Phase 5 | Further Editing & Customization
As I mentioned earlier Kadence AI also integrates well into the block editor & is not just limited to importing Starter templates, you can use Kadence AI’s additional features to customize & tweak the appearance as you like.
Design or Edit Pages with AI-powered patterns
The Kadence Design Library now has AI-powered patterns that incorporate the content & styling based on your inputs in the Kadence AI wizard.
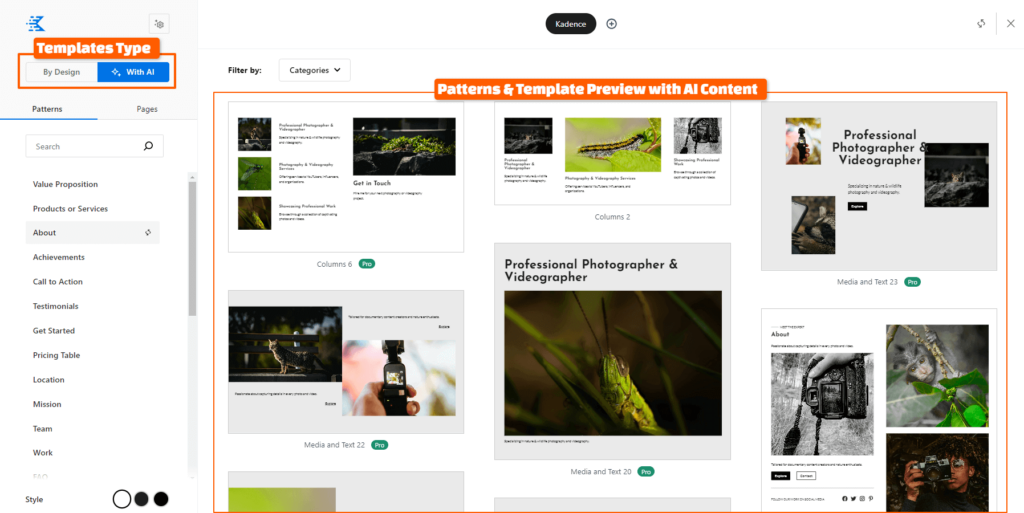
This gives you a lot of sections or rather say “patterns” like Hero, Call to Action, etc pre-filled with AI content that’s relevant to your site.
If you think that the patterns are not up to the mark then you can use Kadence AI’s inline tool to improve your website copy.
Improve or Modify AI-generated content with Inline AI tools
The Kadence AI seamlessly integrates into the WordPress editor through the Kadence text block.
Whether you use patterns with just placeholder text or AI-generated content, you can make the copy truly yours with the help of Kadence AI. Here’s how to do it.
Select the text you want to edit to access its block toolbar. Click the Kadence AI icon to open the inline editor.
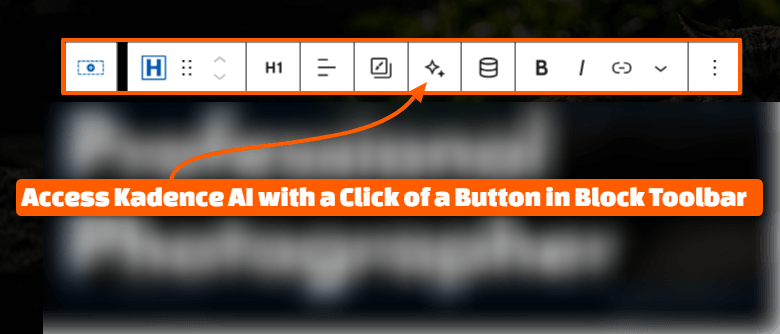
This inline AI editor allows you to improve your text in a couple of ways; preset or manual prompts.
The preset ones are best for small adjustments like
- Making the text longer, shorter
- Simplify
- Fix spelling & grammar
- Changing its tone
Likewise, you can use manual prompts to get more accurate content.
To write a manual text prompt, click inside the input field of the inline text editor & then write a detailed prompt of what you want Kadence AI to do.
Right inside the editor, you’ll also get the credit info (how much of your Kadence AI credits are remaining)

You can generate a heading, a description for your content, and much more. Furthermore, you can ask the Kadence AI to refine the text & it will do it.
That’s it.
If you’ve followed till now,
Congratulations! 🎉
You’ve successfully built a stunning website.
Final Thoughts: Building a website with Kadence AI
Seriously, Kadence AI is a game-changer as it helps you to set up a functional WordPress website in less than 30 minutes & the best part is that it takes very little effort in the design & content aspects.
Furthermore, you can customize each & every aspect of your website to make it truly yours.
Don’t like the text generated by Kadence AI?
→ Use the Inline editor to Improve & Update
Want different/custom images?
→ Update AI-curated library
Want to modify details, business descriptions, or keywords?
→ Update Kadence AI Details
Whatever customization you need, you can get it done in the Kadence ecosystem & that’s the best part.
Kadence AI is great for…
- Freelancers
- Agencies
- And Individual web creators who want to build their site as quickly as possible & focus on the business aspects & not the design & development.
Kadence AI takes care of the design & development part so you don't have to & the cost it takes is pretty decent.
So it’s your turn now.
Go ahead & use Kadence AI to build more websites in a fraction of the time.
That’s it for this one.
If you’ve got any suggestions for my Kadence AI tutorial or need help, the comment section is right below & I’d love to help you out.
Lastly, give it a share on your favorite social platform so that this detailed tutorial reaches like-minded folks & you can help them learn how to use Kadence AI to build WordPress websites faster.
Cheers,
Kuldeep
An absolute beginner friendly tutorial, I didn’t know anything about Kadence but after watching this I understood how Easy it is to make website using AI especially Kadence AI.
Thank You Very Much Kuldeep!
You’re welcome! I’m glad you found the tutorial helpful and that it made creating a website with Kadence AI easy for you. If you have any more questions or need further assistance, feel free to ask. Happy website building!