5-Step Process to Integrate Paytm Payment Gateway with WooCommerce Store
👋 Need help building or fixing an Elementor website?
I design fast, conversion-focused WordPress sites using Elementor.
Wondering how to add Paytm payment gateway to a website, particularly on the WordPress WooCommerce website?
Well, you’ve landed on the right blog post.
Along with Razorpay, Instamojo & PayUmoney, I’ve been using the Paytm payments gateway (since 2019) for one of my side projects & to date, I can say that Paytm for WooCommerce has worked great for me & it's really a good payment partner, especially when it comes to settlements.
I prefer Paytm & Razorpay as they both are established & popular amongst the end user i.e. customers.
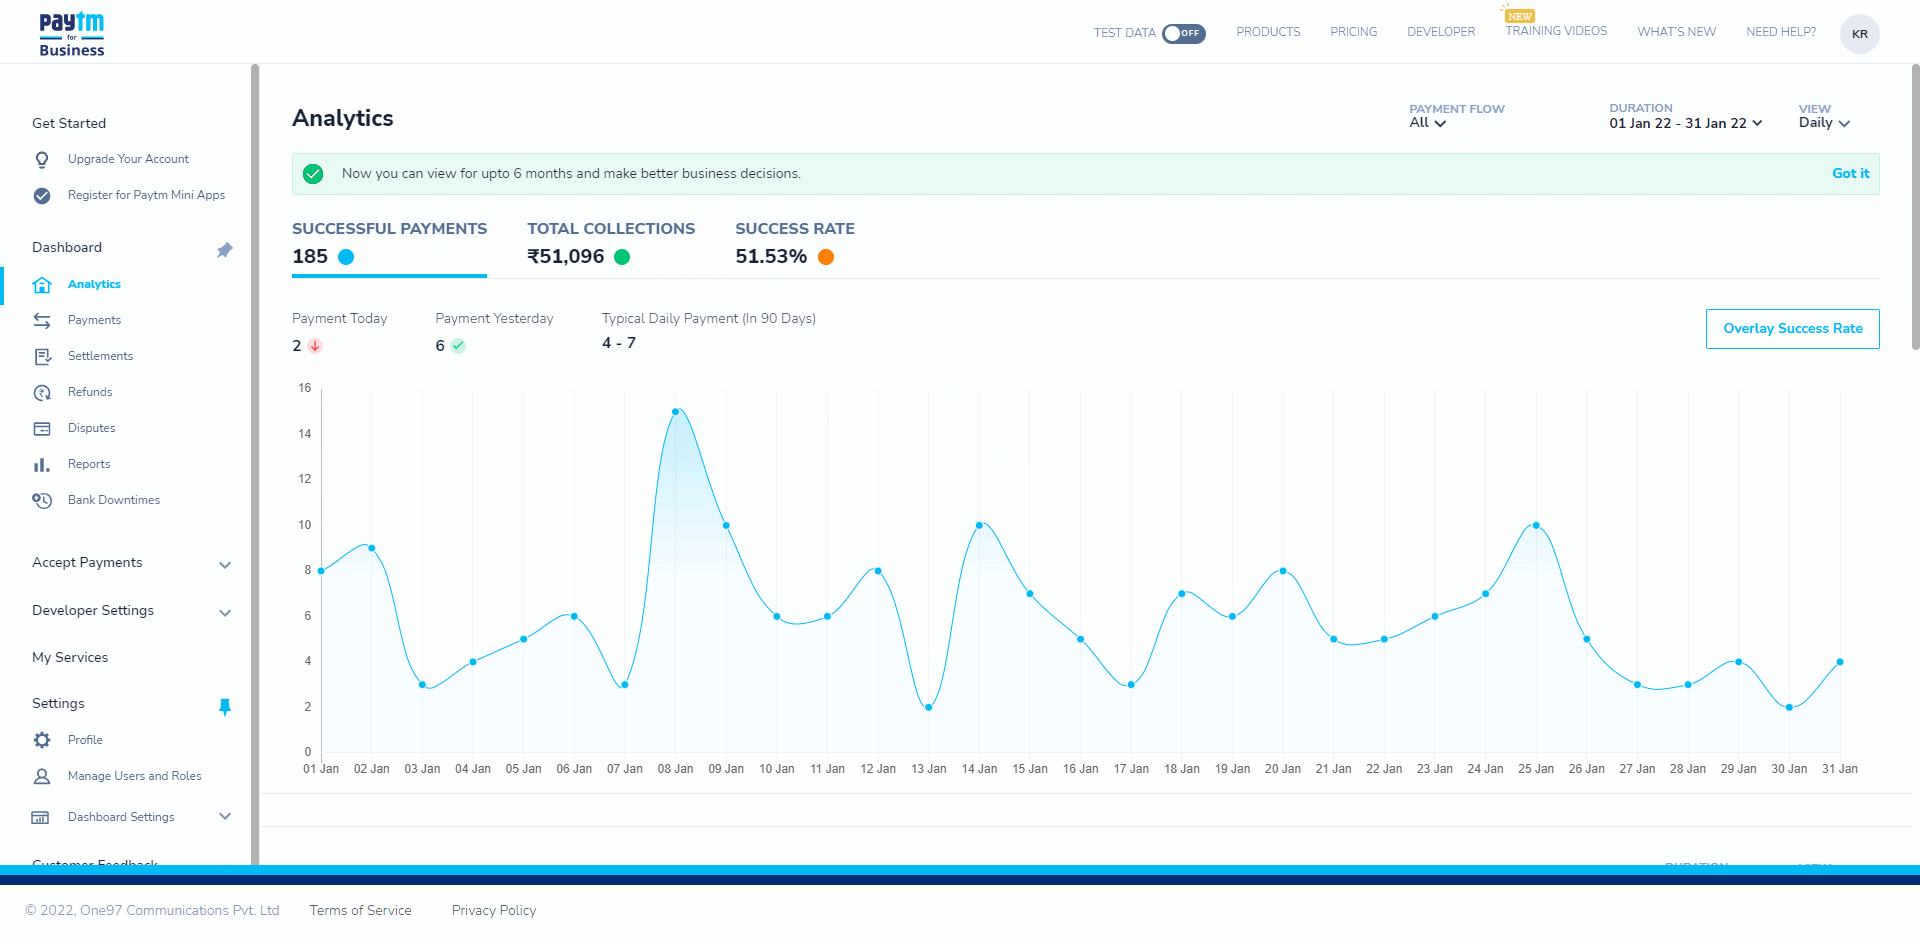
Don't believe my words rather here's a screenshot of the revenue (from one of the side projects) that I've generated using the PayTM payments gateway in the last month.
In this short & precise guide or rather say tutorial, you’ll get to know:
- A few things to check before integration
- How to Download & The Installation Process
- The Right Configuration
- How to Test the PayTM WooCommerce Integration
- Bonus: Simple hacks to skyrocket your WooCommerce site
If you stick to the end of this tutorial, I can assure you that you’ll have your Paytm WooCommerce integration done with ease & free of cost.
So without further ado, let’s dive in.
Quick Note: I’m considering that you already have your merchant account registered on Paytm Business. In case you don’t have one, you can create your PayTM Business account here & then follow along with the tutorial.
5 Simple Steps to Integrate Paytm Payment Gateway with your WooCommerce Store
Even before installing the Paytm plugin, first and foremost,
Step 1: Check for compatibility
- Paytm plugin for WordPress requires WordPress version to be 4.0.1 or higher (better if you have the latest version of WordPress)
- Make sure your WooCommerce plugin is above version 2.4 (it’s better to have the latest version)
- Check if your PHP version is above 5.6.0
To check your WordPress & PHP versions, simply navigate to Tools > Site Health > Info.
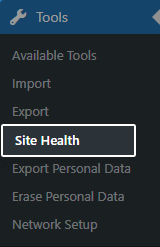

Under the WordPress tab, you’ll get to know your current WordPress version & expanding the server tab will give you the info about your PHP version.
Quick Note: The latest version of PHP is v.8 but it’s recommended to use PHP 7.8 as it's stable.
If you’re on a lower version of PHP, ask your hosting provider to upgrade it to v.7 for better & faster performance (more on speed performance later)
Once this small check is done, it’s time to add the plugin to our site & do the Installation.
Step 2: Get the Paytm Plugin for WordPress & complete the installation
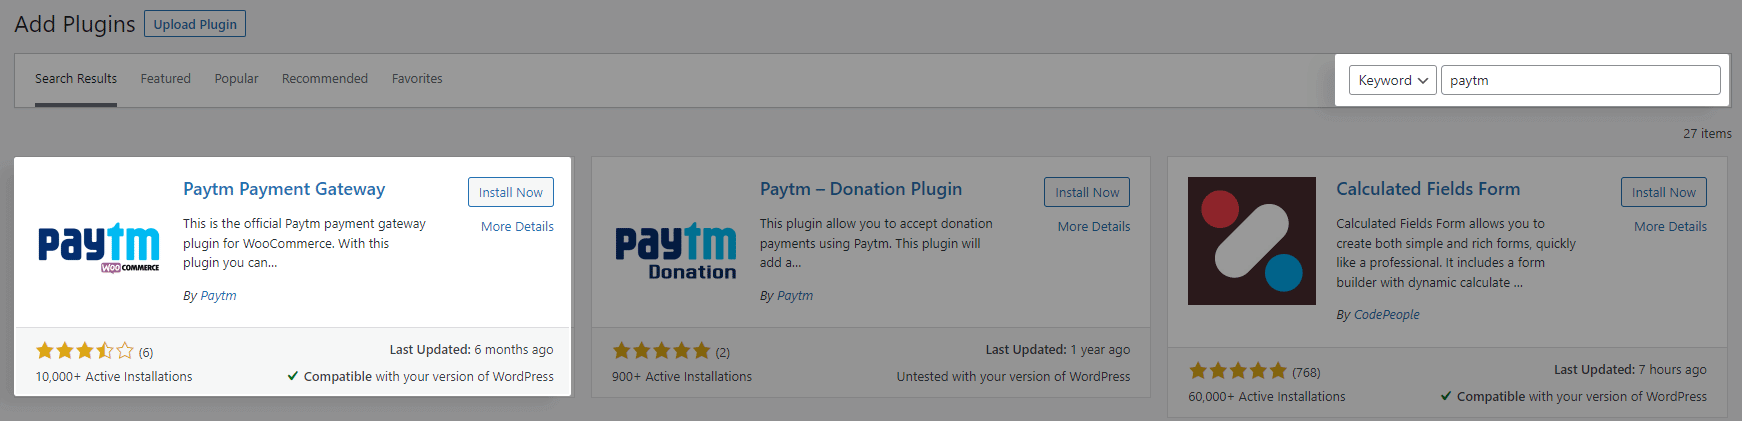
Step 1: Download the plugin. There are two ways to do it. One is to download the Paytm WooCommerce Plugin from the Github repository.
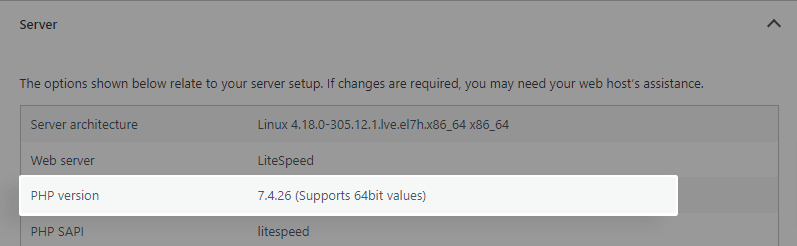
And the second way is to get it directly inside your WordPress dashboard. Simply navigate to Plugins > Add New.
Here, type “paytm” in the search bar…
Now Install and Activate the Paytm Payment Gateway plugin.
Once the installation is done, the next step is to get the API credentials…
Step 3: Generate & Get your Merchant API Keys from Paytm Dashboard
To generate your API keys, you need to follow these 5 steps…
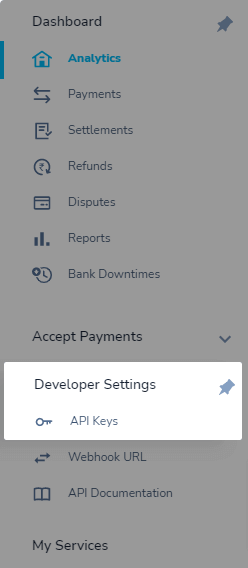
Step 1: Log into your Paytm Dashboard
Step 2: From the Left Sidebar Menu, Click on Developer Settings > API Keys
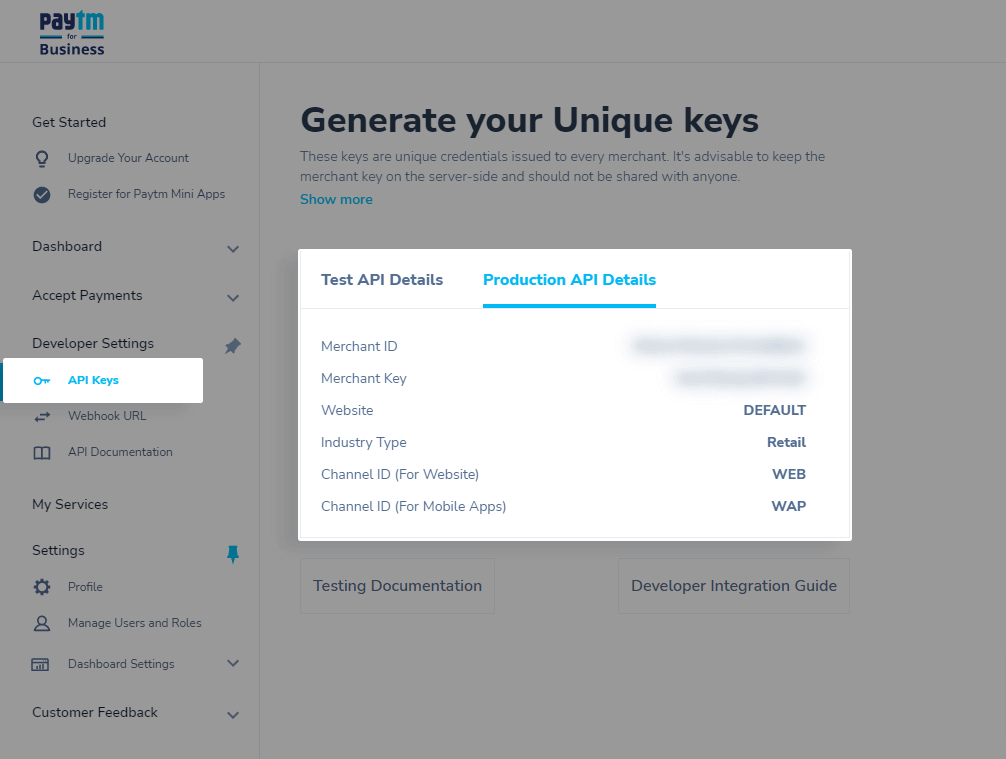
Step 3: Now, you’ll get two modes. One is Test mode for testing purposes & the second one is Production for live & production sites.
Select the mode for which you want to generate your API Keys.
If you want customer transactions on your WooCommerce website, go for the production API Keys. All you need to do is click on the “Generate Now button”.
It may take a little while to generate the Merchant ID & Merchant key.
Quick Note: You’ll need to first verify your documents (if you haven’t) to generate the Production API keys.
Once you get the Merchant ID & Merchant key, all you need to do is copy & paste those details inside the WooCommerce Paytm settings. Let’s do that.
Step 4: Paytm & WooCommerce Configuration
Step 1: Go back to your WordPress dashboard, and navigate to WooCommerce Settings > Payments.
Step 2: Click on the “Setup” button or Paytm Payments.
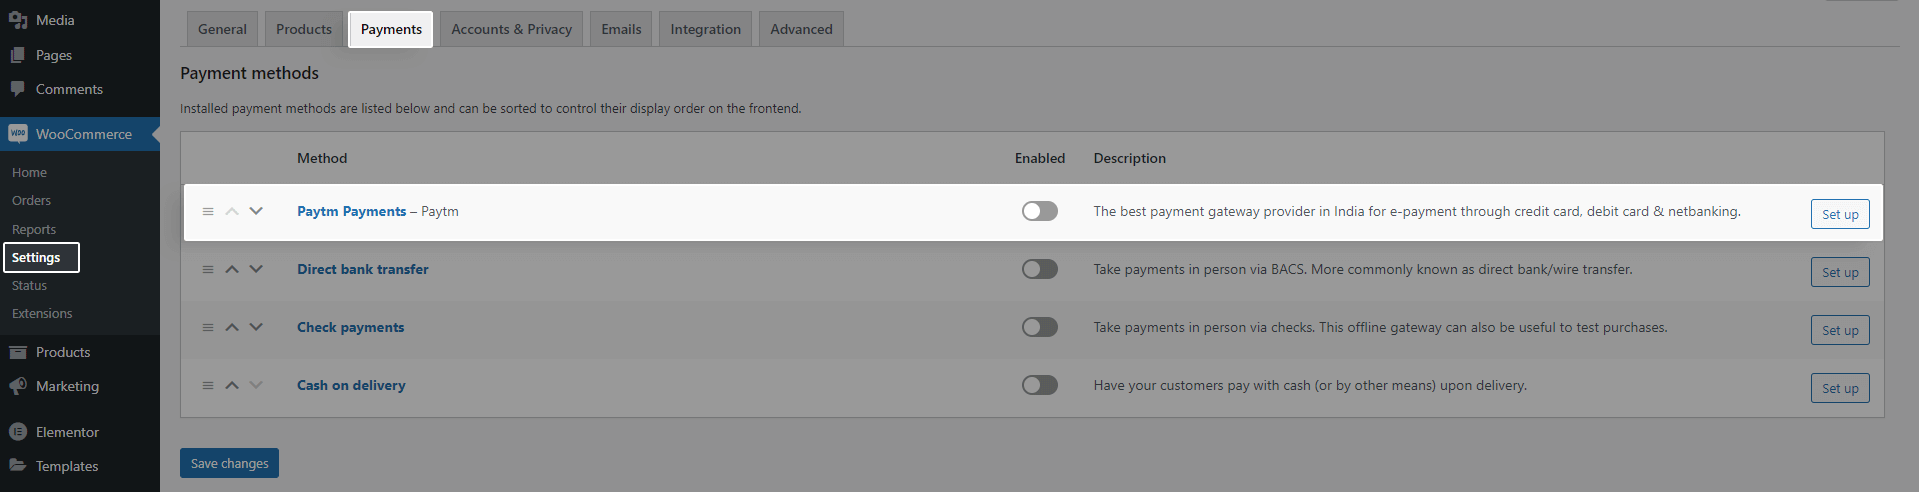
Quick Note: If you don’t see the Paytm option under Payments then you haven’t activated the plugin. Just activate the plugin from the WordPress Plugin manager to get these settings.
Step 3: Enlarge & view the below Image & then fill in the following credentials…
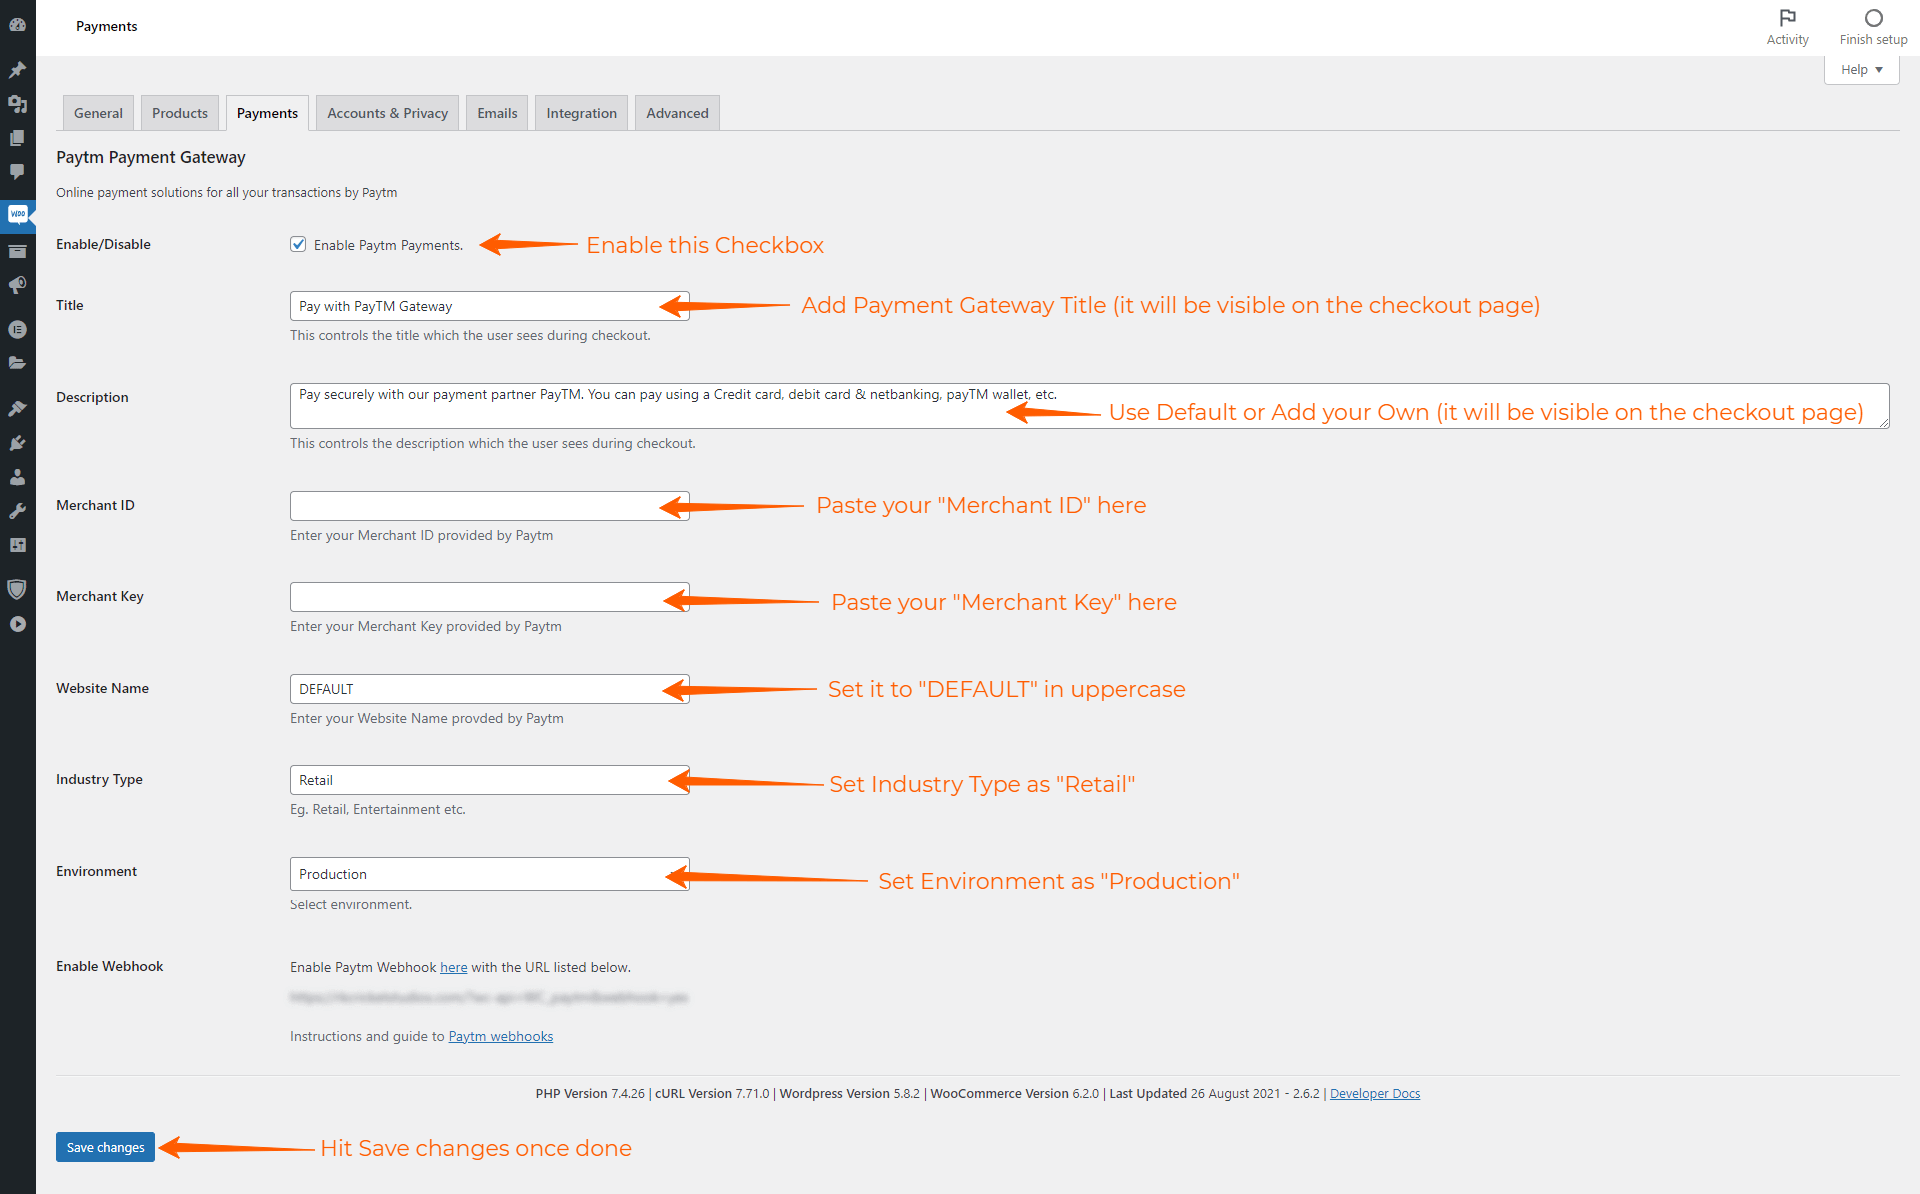
- Enable/Disable: Enable Paytm Payments
- Title: Paytm or Pay with Paytm (use default or use your own)
- Description: Pay securely with our payment partner Paytm. You can pay using a Credit card, debit card & net banking, Paytm wallet, etc. (use default or use your own)
You’ll need to refer to your Production API Keys inside the Paytm Merchant Dashboard for the following parameters…
- Merchant ID: Provided by Paytm (under Production API > Merchant ID)
- Merchant Key: Provided by Paytm (under Production API > Merchant Key)
- Website Name: DEFAULT (better to keep it in uppercase)
- Industry Type: Retail
- Environment: Production
Quick Note: Don’t share your Production API Keys with anyone. Also, note that you might get Channel ID (for website & app) inside the Production API details which is currently of no use.
Step 4: Simply click on the save changes button & you’re done.
You’ve successfully integrated Paytm with WooCommerce.
Now, this Paytm WooCommerce integration will add a Paytm Payment option on the WooCommerce checkout page where users can choose Paytm as a payment method.
Note: Although Paytm doesn’t provide an on-site checkout experience like Razorpay, it does the job & I think it's suitable for most businesses.
When the user selects paytm as the payment option on the checkout, he/she will be redirected to the Paytm website to complete the transaction. Once the payment is done, paytm will send the user back to your website along with the transaction & order details.
As an admin, you can view all the transaction details in your WooCommerce Store (under orders) as well as your Paytm dashboard.
The last step is to make sure the integration works fine. So, let’s do a simple test.
Step 5: Self-Payment for Testing the Integration
Visit your website in incognito mode & then follow the traditional method i.e View a Product > Add to Cart > Checkout.
On the checkout page, you should get the paytm payments option along with its logo.
Fill in the required details & proceed to purchase using the Paytm gateway.
You’ll be redirected to the paytm website. Complete the transaction & you should be redirected to your site along with your Order details.
Now, log in as an administrator & check your WooCommerce Orders as well as the Paytm merchant dashboard.
If all the payment details match, the Paytm WooCommerce integration is perfect.
If there are some issues or unknown errors, you might need to go through the article again or raise a support query at Paytm. You can also share your issue in the comments below.
Now if you want to improve your WooCommerce site, stay ahead of your competitors & provide the best user experience to your customers, here are a couple of bonuses for you…
Bonus: Two Simple hacks you can follow today to Skyrocket your WooCommerce Store
Quick Note: Before making any assumptions, or skipping the section, please read through & then make wise decisions.
Setting up your WooCommerce Store, listing your products & Integrating the Paytm payment gateway isn't enough in this competitive eCommerce space.
There’s a lot more you should do to make your site better than your competitors. One such thing is to:
Leverage the Power of Cloudways WooCommerce Hosting
Based on some (sponsored) recommendations, you might have chosen any of the hosting companies for your WooCommerce Store.
It’s not your fault, this hosting industry is been like that for decades. Just for affiliate commissions, people recommend anything.
Well, I don't belong to that group. I love marketers & I aspire to be an honest one. (Check any of my hosting recommendations, you'll always find Cloudways as the #1)
As a business owner, you don’t need to spend hours gaining (not-so-imp) knowledge about shared hosting, VPS hosting, cloud hosting, etc.
Pro Tip: If you want your WooCommerce site to be safe & secure, always stay online, load at a lightning speed & provide a better customer experience, just give it a shot to Cloudways hosting for your WooCommerce site.
No No, you don't need to do the heavy lifting i.e migrate your site today. There's an easy way.
First, start your 3 days with FREE Trial (No Credit Card Required)
On Cloudways Platform, you get a temporary domain or rather say a sandbox site for testing purposes. In these 3 days, Install WooCommerce, add some plugins & just test its speed & performance. I'm sure you'll be blown away by the speed.
If you like Cloudways, just ask them to migrate your WooCommerce site from your current host. They offer 1st migration absolutely free.

I use & recommend Cloudways for WooCommerce & Elementor-based sites. (Feel free to navigate my site & check the performance).
Here's why I recommend Cloudways for WooCommerce:
- You get the fastest speed at the best price (If your site loads faster, you get higher conversions from your WooCommerce Store)
- It's Cheaper yet better: Some hosting services charge $30/mo for the same speed that Cloudways provide at just $10/mo
- You are free to upscale or downscale your server anytime to ensure cost-efficiency
- You get to select the server location of your choice (You can choose between the Mumbai or Bangalore server for the top speed for Indian customers)
- There's Monthly billing (no yearly contracts, no high renewals)
- The built-in caching mechanism on server levels for the best speed
- 24*7 customer support (in case you need any help)
- 5 cloud hosts to choose from (DigitalOcean, Linode, VULTR, AWS, & Google Cloud)
- Lastly, it’s a reputed & trustworthy company (4.8 ratings on Trustpilot)12q
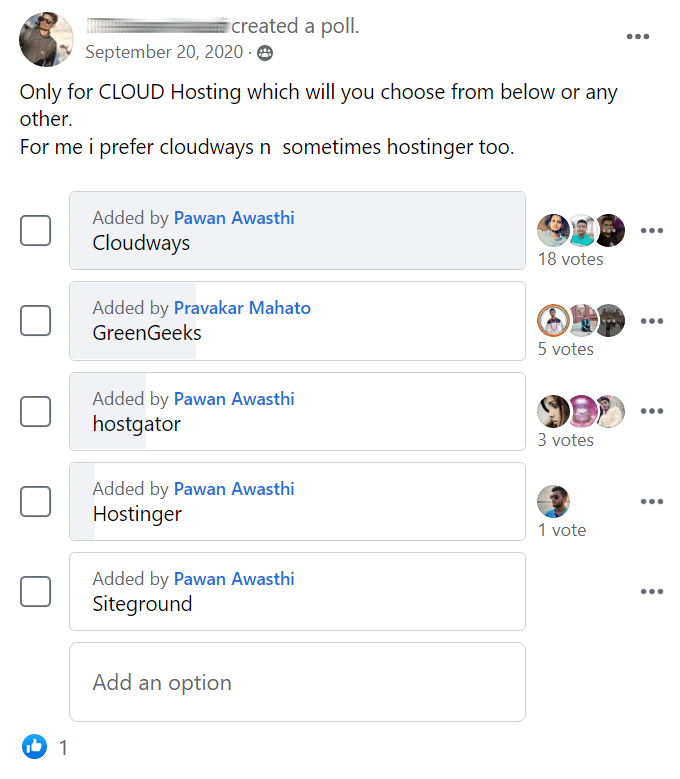
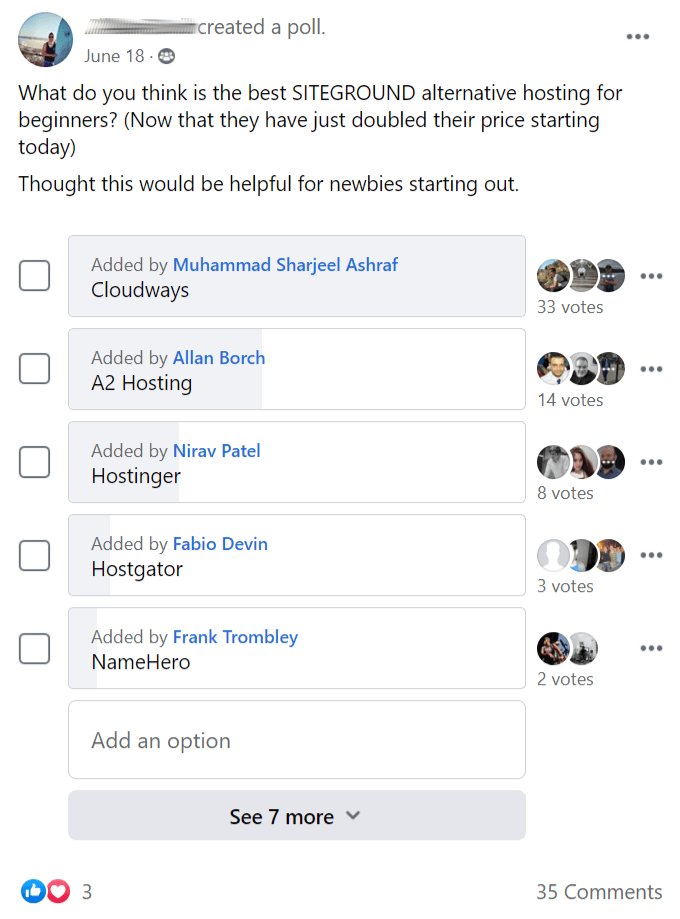
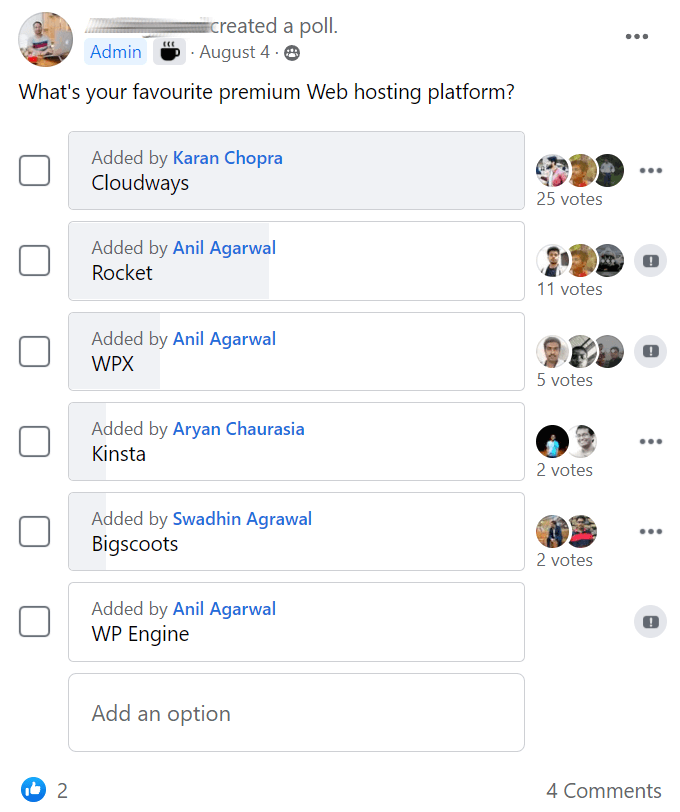
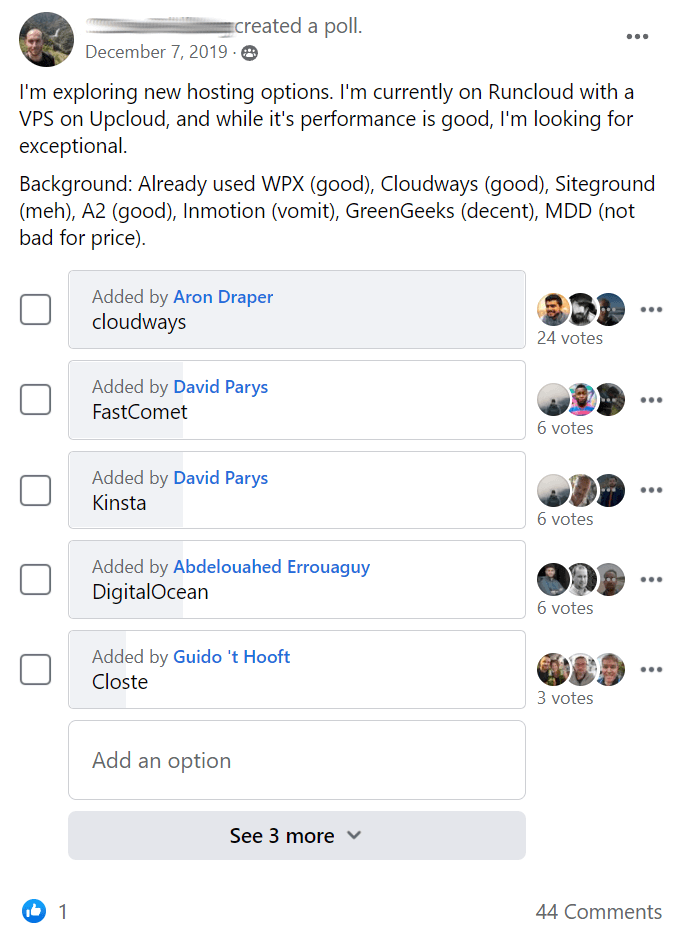
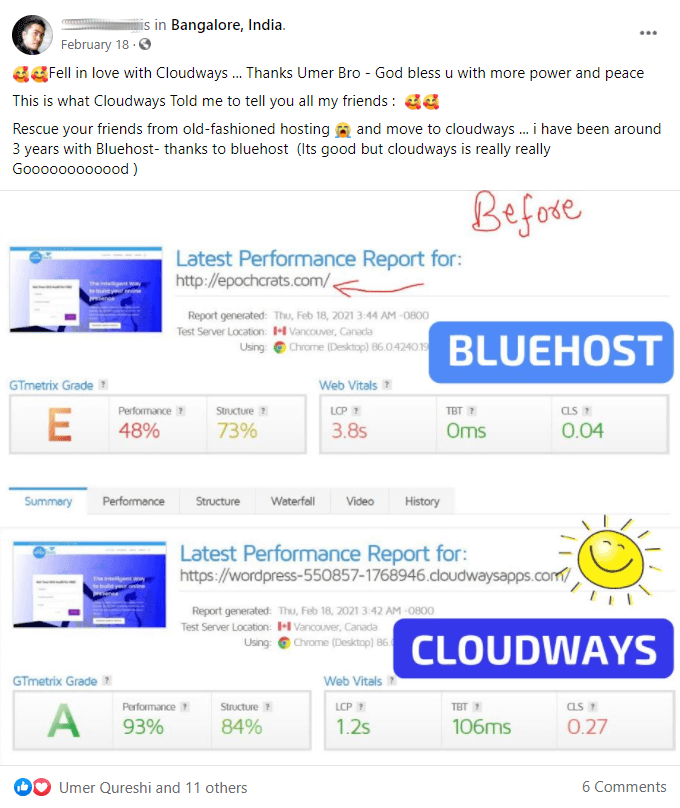
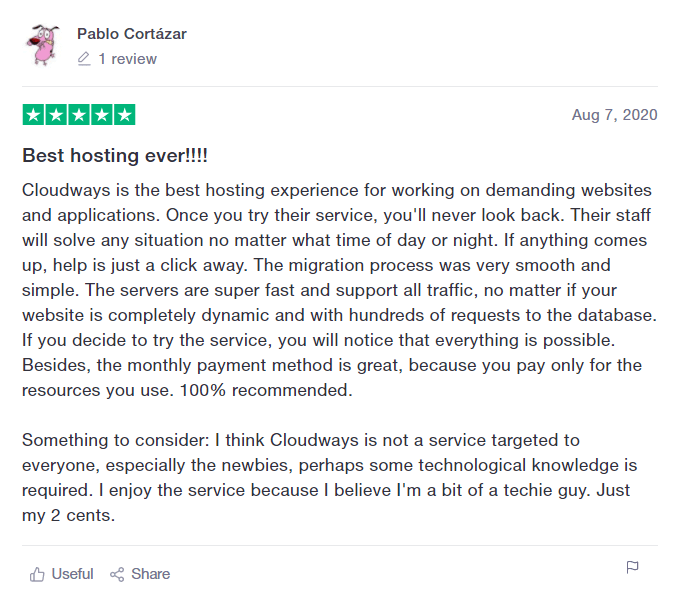
Spend a couple of mins reading these Facebook polls & reviews:
Using Cloudways, you get what every eCommerce store owner needs i.e a secure website, higher conversions, and happy & returning customers.
Optimize your Conversion Pages with Elementor
Apart from using Cloudways, what you can do to make more profits from your WooCommerce site is to design your conversion pages i.e landing pages, cart pages & checkout pages with the #1 WordPress page builder – Elementor.
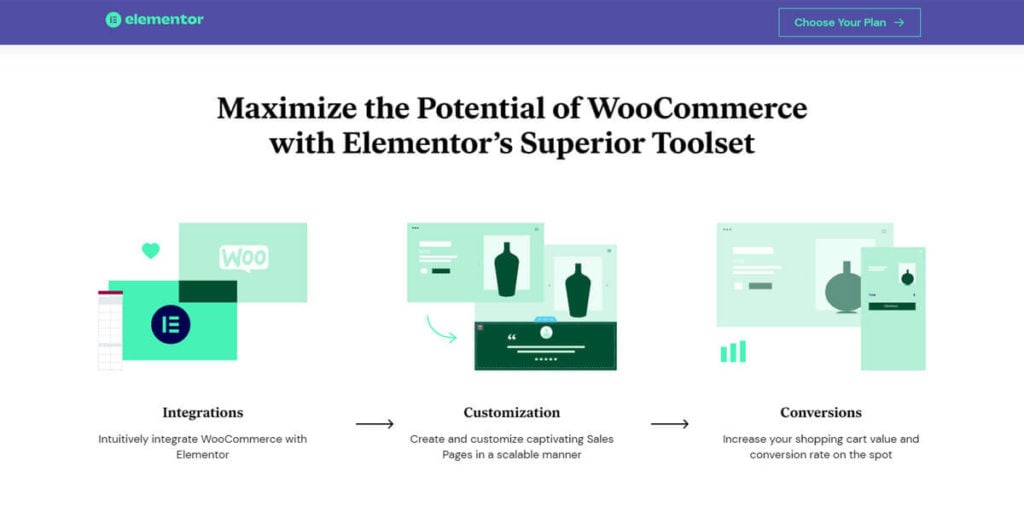
In a nutshell: Elementor is a drag & drop page builder that lets you create your entire website without writing a single line of code. Take a look at awesome Elementor features.
As it’s beginner-friendly & easy to use, more than 8M+ website creators are already using it including me (you can check my tools & about page, they both are built using Elementor)
See how easy it is to design your WooCommerce store with Elementor:
[presto_player id=2764]
This tool is really handy for eCommerce business owners as it comes with a full eCommerce suite where you can edit & customize your product page, shop page, cart & checkout page as well as my account page.
I highly recommend using Elementor if you want to have full control over your site, have a modern design that impresses your customers & have a conversion-focused checkout that gives you more sales.
Hosting your WooCommerce site on Cloudways & using Elementor for your most important pages is a wise decision to make. I'm sure that your ROI will be much higher if you invest in these two tools.
Final Thoughts
I hope this tutorial helped you Integrate Paytm Business with your WordPress WooCommerce site. I wish you the best of luck with your online business.
Do let me know whether or not your integration was done successfully.
Also, let me know which hosting provider you're currently using.
If you've got more questions or have any suggestions for me, feel free to put them in the comments below.
Pro Tip: Planning to use multiple payment gateways along with PayTM?
Check out the 7 Best Payment Gateways for WooCommerce in India.
Here are a few of my Top Recommended Payment Gateways:
1) Razorpay
2) PayUmoney India
3) Instamojo
And then learn to:
1) Integrate Razorpay with WooCommerce
2) Integrate PayUmoney with WooCommerce
3) Integrate Instamojo with WooCommerce.

About the Author
Kuldeep Rathore is a WordPress & Elementor expert and co-founder of 60Pixel. With 3+ years of hands-on experience, he builds fast, SEO-optimized websites for creators and small businesses. Through this blog, he shares practical tutorials and tips trusted by the WordPress community worldwide.