How to Add Captcha in Elementor Forms? [3 Simple Steps for Enhanced Security]
👋 Need help building or fixing an Elementor website?
I design fast, conversion-focused WordPress sites using Elementor.
Contact forms are a great way to attract users to your email list, but spam can quickly weaken their effectiveness.
According to Statista, spam emails accounted for over 45% of all email traffic in the US in 2023.
And you don’t want that with your Elementor contact forms & hence you wanna add captcha in Elementor form, right?
Well, probably, yes otherwise you won’t be reading this article 😅
I'm sure you might have received a lot of contact forms with fake entries from bots causing issues with your email service provider.
This can even lead to your domain being flagged as spam.
Additionally, sitting down & manually removing spam from your contact list is frustrating & time-consuming. I know you might have tried various anti-spam methods to stop it, but most of them just don’t work.
No worries, I’ve got your back.
Here’s what I’ve covered in this article…
What is Captcha?
Captcha stands for “Completely Automated Public Turing Test to Tell Computers and Humans Apart.”
To put it simply; it's a security tool designed to differentiate between human users and automated bots.
Captchas are used to
- prevent spam,
- unhuman attacks, and other types of automated abuse and help identify whether a user is a human or a bot.
How Does Captcha Work?
Captcha works by presenting a challenge that is easy for humans but difficult for bots to solve.
When a user interacts with a Captcha, they are asked to…
- identify objects in an image,
- solve a simple puzzle,
- or type out distorted text.
ℹ Captcha tests human psychological skills, which is still challenging for most automated systems to mimic accurately.
Now that you know what a captcha is & how it works, take a look at the types of captcha you can use on your website…
Types of Captcha & Benefits of Using It
- Text-Based Captcha: Requires users to read and input distorted text shown in an image.
- Image-Based Captcha: The user needs to identify and select specific objects within a set of images (e.g., “Select all images with traffic lights”).
- Math-Based Captcha: The user needs to solve a simple math problem.
- Audio Captcha: Provides an audio challenge for visually impaired users.
- reCAPTCHA: The most widely used Captcha system offered by Google, includes:
- reCAPTCHA v2: This is the classic “I'm not a robot” checkbox with an optional image challenge. It's easy to use and effective at blocking basic bots.
- reCAPTCHA v3: This is a more advanced version that runs invisibly in the background. It analyzes user behavior to determine their spam likelihood and assigns a score. It provides a smoother user experience while offering powerful spam protection.
What are the Benefits of Using Captcha?
- Prevents Spam: Stops automated bots from submitting forms and comments.
- Enhances Security: Protects against brute force attacks by ensuring login attempts are human.
- Improved Data Quality: Integrating Captcha verifies that the data collected through forms is submitted by real users.
- Accessibility Options: Modern Captchas, like reCAPTCHA, offer options for accessibility to accommodate all users.
Now that you know the types of captcha's & the benefits, let's add it to the Elementor forms…
🔖 Most Read Elementor Tutorials…
How to Add reCAPTCHA to Elementor Forms?
Adding reCAPTCHA to your Elementor forms is simple. Here's a step-by-step guide to integrating reCAPTCHA v2 and reCAPTCHA v3…
Adding reCAPTCHA v2 to Contact Forms in Elementor
STEP 1: Get reCAPTCHA V2 API Keys
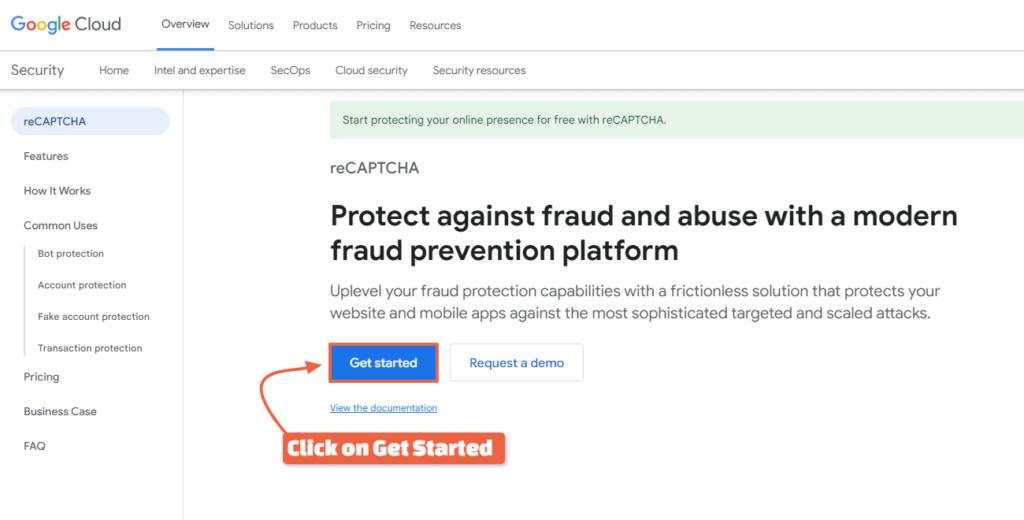
- Visit the Google reCAPTCHA Website.
- Click on “Get Started” to head over to the admin panel.
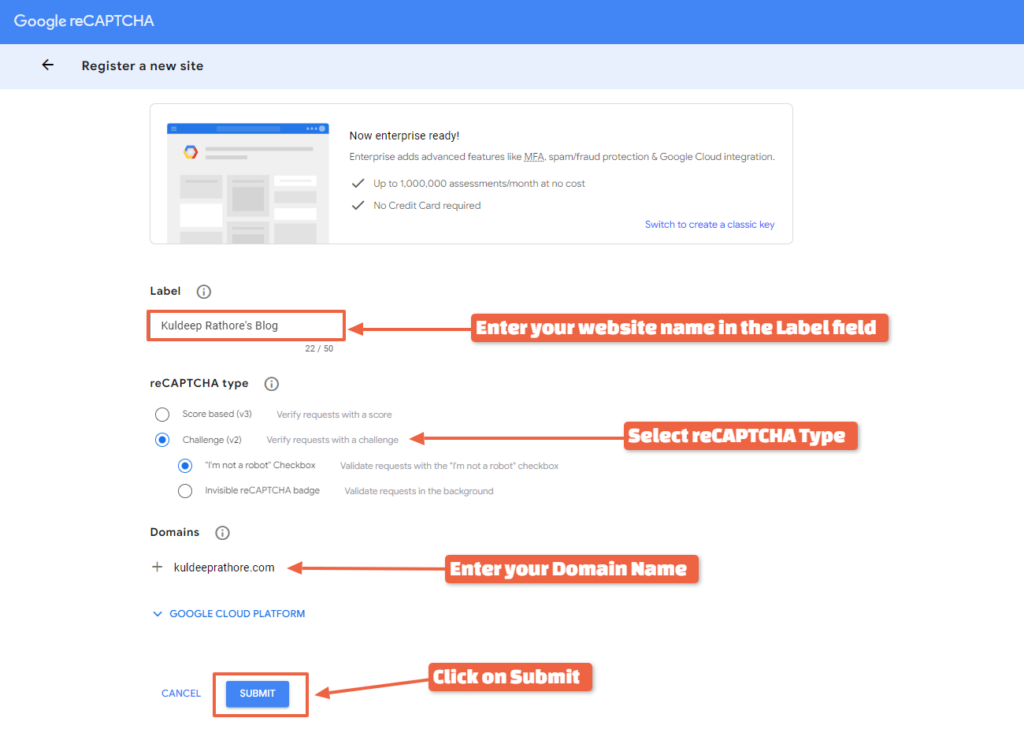
- In the label field, enter your website name (for e.g. Kuldeep Rathore's Blog)
- Under reCAPTCHA type; select Challenge (v2) & after that;
select the “I'm not a robot” checkbox - Enter the domain you want to secure
- Accept the terms and conditions (if presented) and Click on the Submit button.
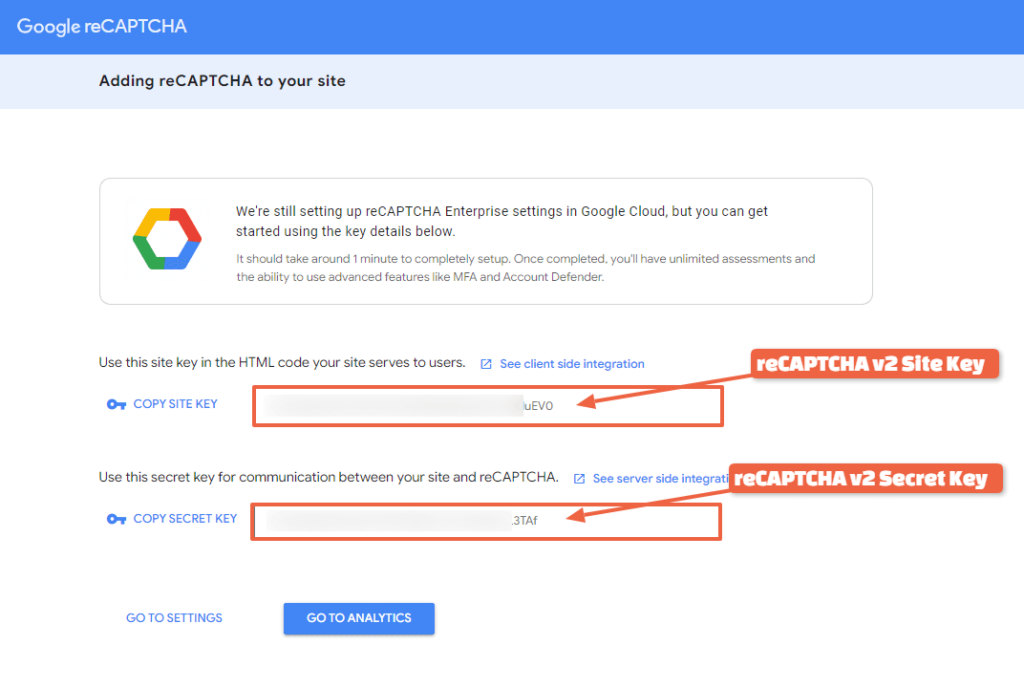
- Once done, you will get 2 APIs.
- Copy that Site Key and a Secret Key.
Keep these keys secure, you will need them in the next step.
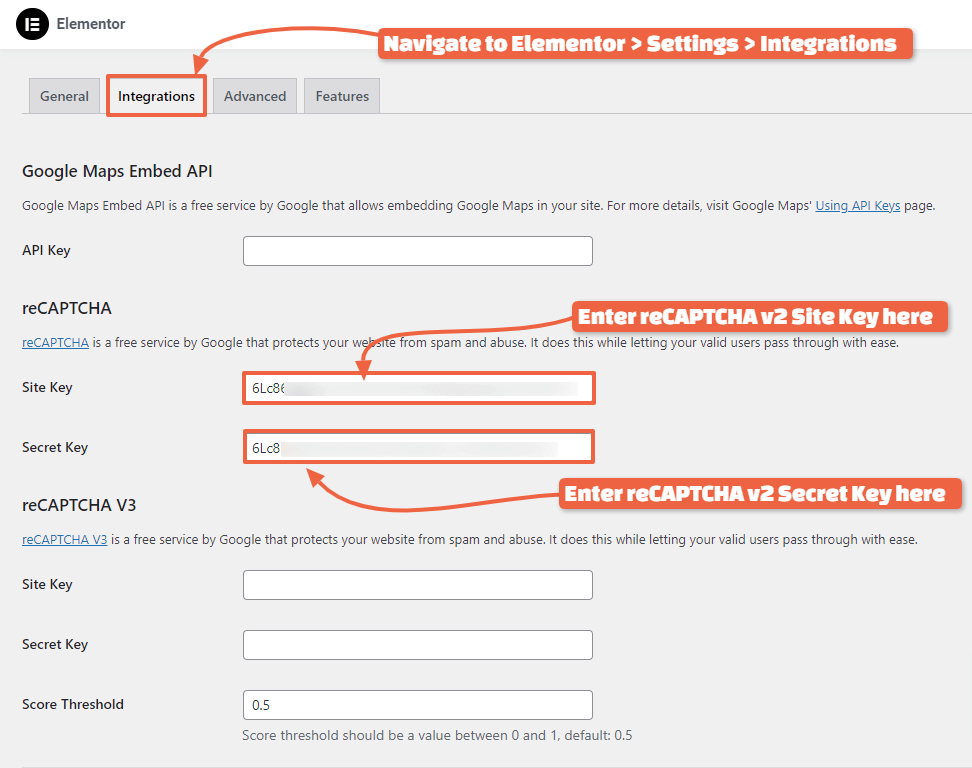
STEP 2: Set Up reCAPTCHA V2 API in Elementor
- Login to your WordPress Dashboard
- Go to Elementor > Settings > Integrations.
- Under reCAPTCHA, enter the following:
- Site and Secret Key (Copy & Paste)
- Click Save Changes.
STEP 3: Add reCAPTCHA to Your Elementor Contact Form
- After integration, create a new page or the one where you're using the contact form.
- Edit the page using Elementor.
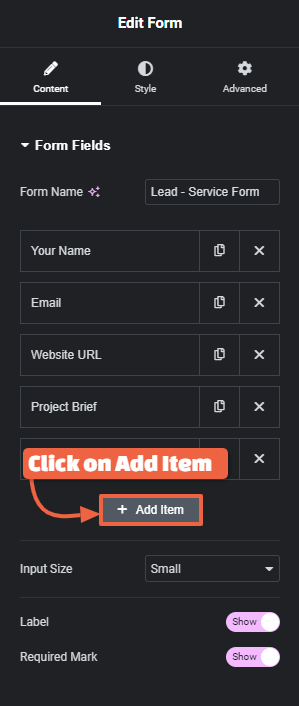
- Click on the “Form widget” you want to add Captcha to and open its edit panel.
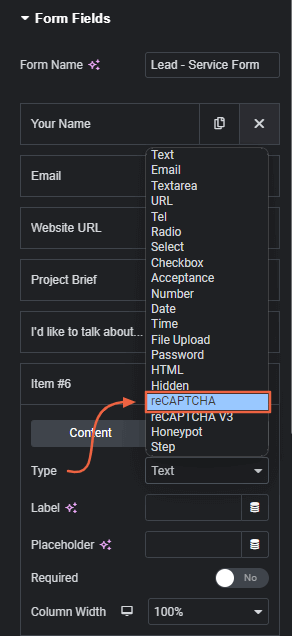
- In the edit panel, look for the “Add Item” button and enter the following
- Type – Choose reCAPTCHA.
- Labels – Write a descriptive text that helps users understand (it's optional)
- Size – Edit the layout of the reCAPTCHA badge – Normal or Compact.
- Style – Select Light/Dark mode.
- Save your form and publish the page.
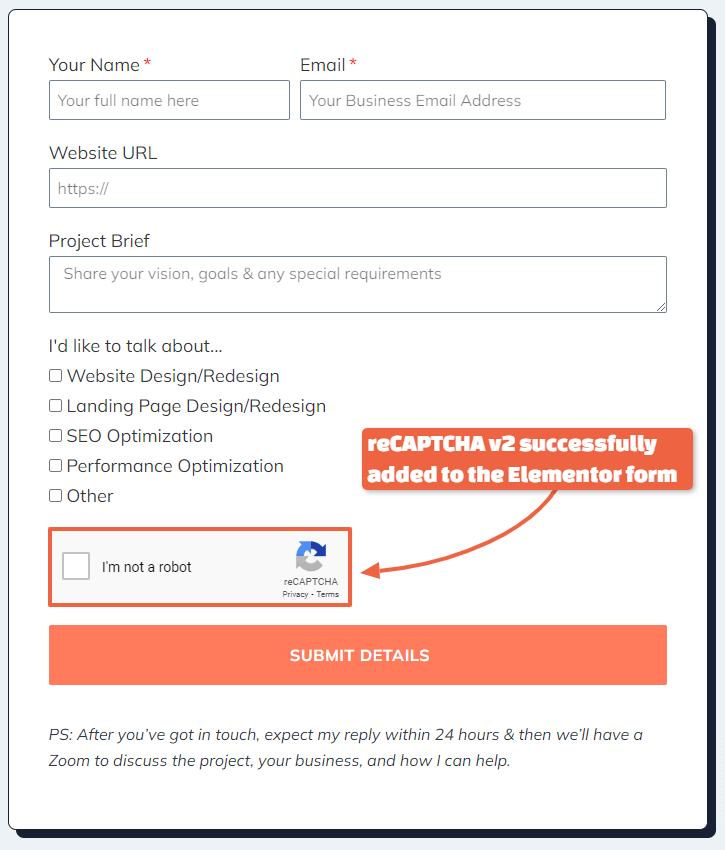
That's it!
Congratulations 🎉
This is how you can integrate reCAPTCHA v2 in your Elementor Contact Forms.
Now let me guide you on the newer version i.e. reCAPTCHA v3…
Adding reCAPTCHA V3 to WordPress Elementor forms
STEP 1: Get reCAPTCHA V3 API Keys
- Visit the Google reCAPTCHA Website.
- Click on “Get Started” to head over to the admin panel (same as v2)
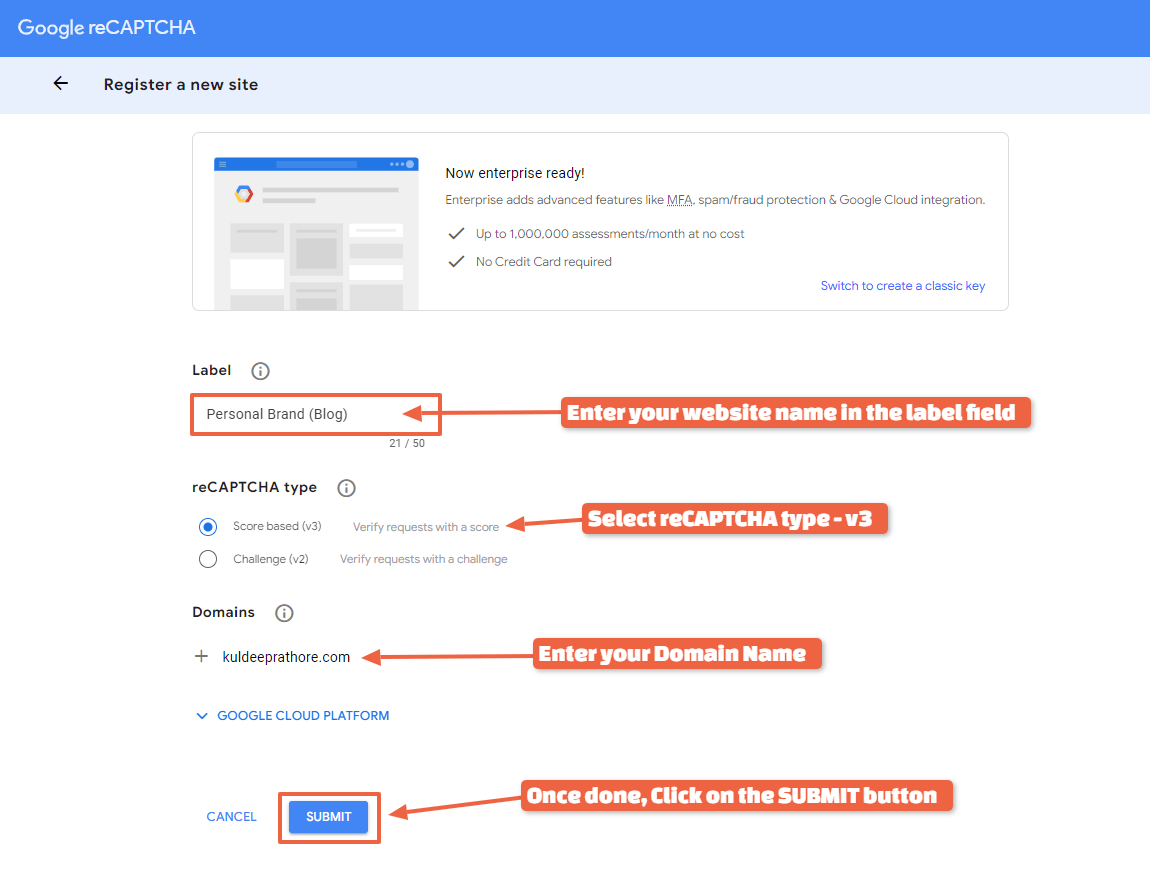
- In the label field, enter your website name (for eg. Kuldeep Rathore's Blog)
- Under reCAPTCHA type; select reCAPTCHA V3
- Enter the domain you want to secure
- Accept the terms and conditions (if presented) and Click on the Submit button.
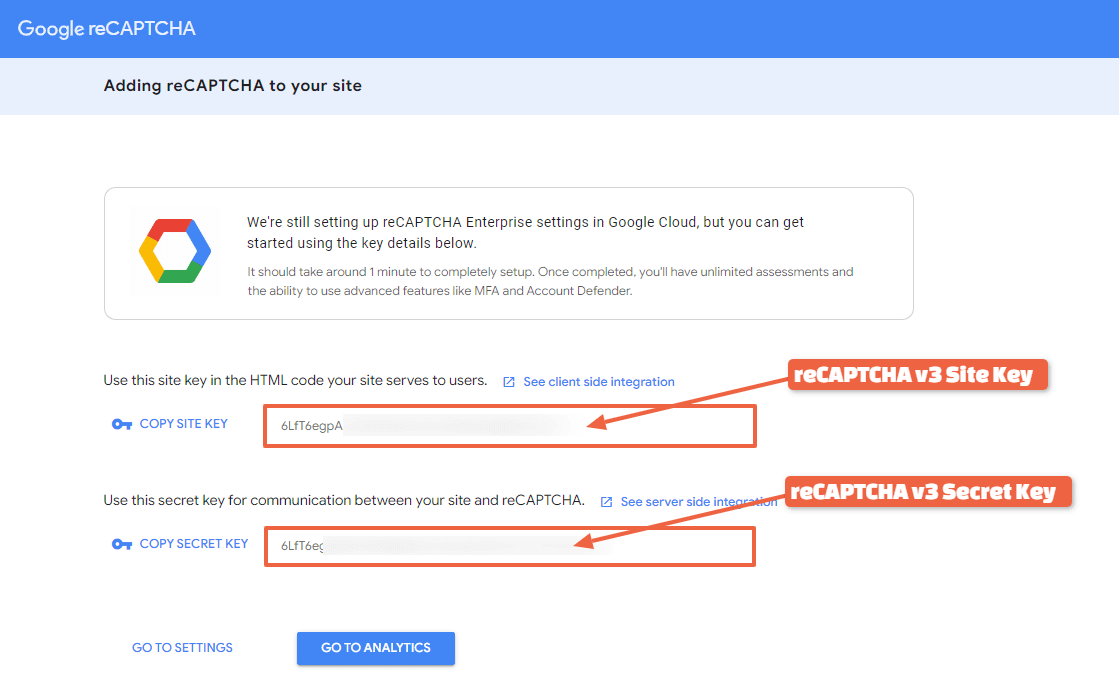
- Once done, you will get 2 APIs
- Copy that Site Key and a Secret Key.
Keep these keys secure, you will need them in the next step.
STEP 2: Set Up reCAPTCHA V3 API in Elementor
- Login to your WordPress Dashboard
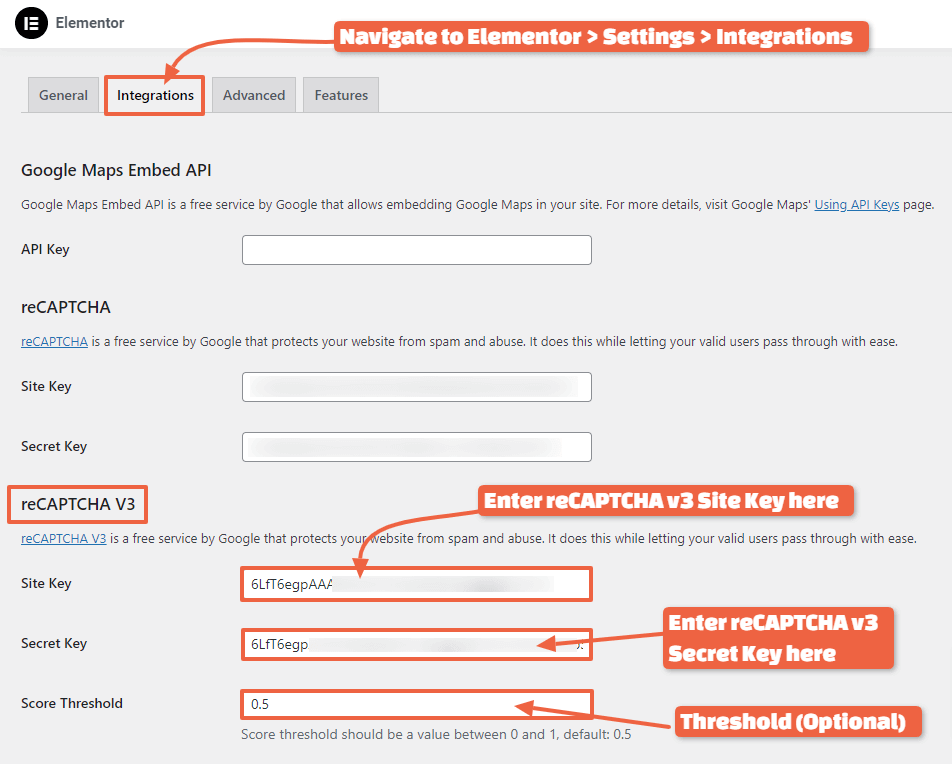
- Go to Elementor > Settings > Integrations.
- Under reCAPTCHA, enter the following:
- The Site and Secret Key
- You can also add a score threshold (optional) that determines how “human-like” a user's activity needs to be for them to pass the challenge.
- Click Save Changes.
STEP 3: Add reCAPTCHA to Your Form
- After integration, select a new page from the Dashboard panel.
- Edit the page using Elementor.
- Click on the form widget you want to add Captcha to and open its edit panel.
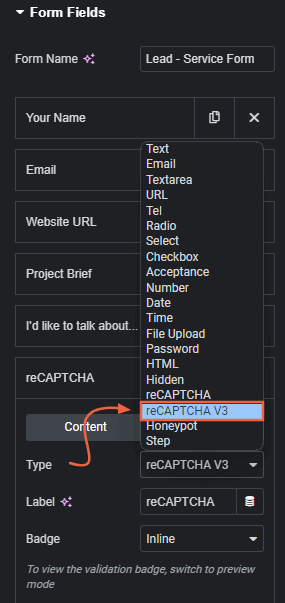
- In the edit panel, look for the “Add Item” button and enter the following
- Type – Choose reCAPTCHA V3
- Labels – Write a label name to identify the action.
- Badge – Set the position of the reCAPTCHA badge – Bottom Left, Bottom Right, or Inline

- Save your form and publish or draft the page.
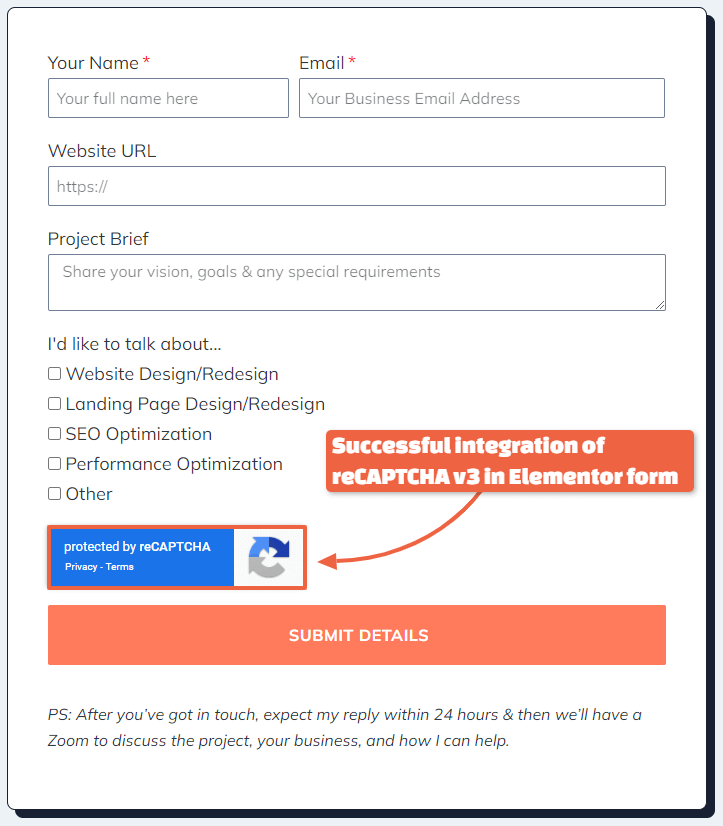
That's it!
Congratulations 🎉
If you've come this far, you should have successfully integrated reCAPTCHA v2 or reCAPTCHA v3 in the Elementor Contact form.
🚀 Useful Elementor Tutorials to Level up your Elementor Game…
FAQs
Now before I wrap up, here are some common questions people have about adding a captcha to Elementor contact forms:
Do I need to add a captcha to every contact form on my site?
Not necessarily. It's recommended to add a captcha to any publicly accessible contact form to prevent spam.
For private/internal forms, a captcha may not be required.
Can I customize the captcha appearance?
Yes, to some extent you can customize the captcha appearance to match your website's branding and design & not that much.
Also, people are used to the blue standard version of Google's reCAPTCHA, so I suggest keeping it to the standard version so that it's easy to recognize.
Will adding a captcha slow down my website?
Adding a CAPTCHA can have a minor impact on your website's performance, but this is typically minimal if implemented correctly.
Wrapping Up
So there you have it!
With a few simple steps, you can add a powerful layer of security to your Elementor forms with CAPTCHAs.
With this guide, you should be able to add a captcha in Elementor form.
Adding the reCAPTCHA will reduce spam submissions and keep your inbox (and sanity) intact.
Drop in a comment & let me know whether you'll be adding reCAPTCHA v2 & reCAPTCHA v3 to your Elementor Forms.
That’s all for this one. I hope this content helps. If yes, do me a favor by clicking on your favorite social button & give it a share.
Cheers,
Kuldeep
🔌 Elementor Widgets to Enhance your Elementor Website…

About the Author
Kuldeep Rathore is a WordPress & Elementor expert and co-founder of 60Pixel. With 3+ years of hands-on experience, he builds fast, SEO-optimized websites for creators and small businesses. Through this blog, he shares practical tutorials and tips trusted by the WordPress community worldwide.

Yes, “Adding the reCAPTCHA will reduce spam submissions and keep your inbox (and sanity) intact”, but it will also drive customers away because of the hassle of having to prove you are not a robot to a robot (absurd!). Which is more important: less customers along with a little less spam or more customers along with a little more spam? I use a simple math captcha on my contact form – friendly to customers and yet stops bot form submissions. reCaptcha is so invasive I will NEVER use this on any of my sites and advise against it for my customers.
Hey MK, Thanks for sharing your perspective!
Balancing security and user experience is important. If reCAPTCHA feels too intrusive, math CAPTCHA is a great alternative that can keep spam at bay without frustrating users.
It’s all about finding what works best for your audience and site. Anyway, your feedback is valuable!