3 Best Elementor Preloaders & How to Add Preloader in Elementor? [2025 Guide]
👋 Need help building or fixing an Elementor website?
I design fast, conversion-focused WordPress sites using Elementor.
If you want a slick animation while your page loads, start using pre-built Elementor Preloader.
Here's how:
→ You can quickly add a preloader using Elementor Pro, a plugin or an Elementor Addon.
→ Head to Elementor Site Settings → Page Transitions, toggle on “Preloader,” and upload your animation.
→ Or install a plugin like “ThePlusAddons” for more styles & different preloader types.
In this guide, I'll walk you through how to set up a preloader in Elementor using 3 methods along with
using page transitions with preloader & tips to improve speed, UX, and get pro-level elementor preloader settings without bloat.
So, let's dive in… (jump directly to methods)
What are Elementor Preloaders & Why Use a Preloader?
A preloader is quite simply a loading animation that displays while your website content is being fetched and rendered in the background.
They bridge that gap between initially hitting a URL and the full page being ready, creating a smoother perceived experience.
Now, just to be fully transparent, I'm not using preloaders or page transitions on my own blog at the moment. With optimizations from FlyingPress, it already loads quickly.
But that doesn't mean you can't benefit from these stylish enhancements that provide an extra level of professional polish & some powerful psychological benefits…
Benefits of Using Preloaders:
Who Should Use Elementor Preloaders?
Think about it: most of us have been conditioned to expect instantaneous results in our internet-driven world.
Any site that appears to load quickly, even if it's just a sleek preloader animation playing,
will feel faster and more responsive.
💡So, if your Elementor-based site has a lot of content, and it takes a little longer (more than 0.3 seconds) to load all the Images, CSS & JavaScript assets, you should use Preloaders.
That initial impression can make the difference between somebody sticking around or having their eyes wander back to that browser tab.
It’s your opportunity to make your brand identity & look more professional.
Here’s a quick glimpse of the types of elementor preloader content you can add to your website.
8 Types of Preloader for Elementor (Content)
When it comes to actual preloader content, you've got plenty of options ranging from simple to advanced:
- Image/GIF preloaders
- Icon/SVG animations
- Text-based loaders
- Pre-built loading icons/spinners (exclusive to Plus Addons)
- Lottie file JSON animations
- Pure CSS animations
- Custom shortcode loaders
- Progress bar animations
3 Simple Methods to Add Preloader in Elementor (#3 is my Fav)
Starting with the easy one (but with some limitations)…
Method 1: Elementor’s Built-in Preloader options
Did you know Elementor comes with a basic preloader already built-in?
Previously, it was not there but recently added it to the site settings.
Imp Note: It’s a pro feature available in Elementor Pro. In case you don't have one, I highly recommend grabbing its advanced license for $99.
Here's how to enable Elementor Preloader:
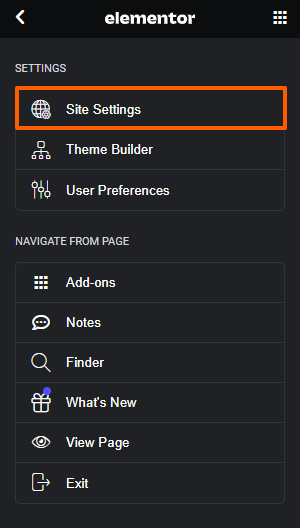
- Step 1: Head over to your Elementor Editor
- Step 2: Click on the hamburger on the top-left side of the Elementor panel.
- Step 3: Click on the “Site Settings” option
- Step 4: Now scroll down, under the settings menu, and click on “Page Transitions”
After clicking on Page Transition, you’ll see a couple of options;
one as “Page transitions” & the other one as “Preloader”.
Under this Preloader feature, you can choose a preloader type…
- Animation
- Icon
- Image

You can put your logo image and customize it using editing options like
animation style, preloader delay, and their styles…
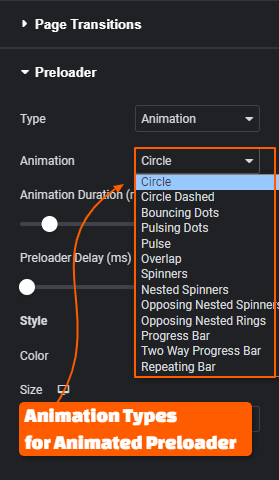
For Animated Preloader, Elementor Pro provides 13 animation types…
- Circle
- Circle Dashed
- Bouncing Dots
- Pulsing Dots
- Pulse
- Overlap
- Spinners
- Nested Spinners
- Opposing Nested Spinners
- Opposing Nested Rings
- Progress Bar
- Two-Way Progress Bar
- Repeating Bar
Likewise, for preloader type Icon & Image, it offers different sets of animation types.
Coming to the customization options, it provides four basic customization options…
- Animation Duration: Control the speed of the Preloader animation
- Preloader Delay: Determines the time interval before the preloader animation appears during webpage loading.
- Size & Color: The name says it all. Adjust the preloader size & choose the color as per your brand's design system.
For most, this might do the job but it's a basic one & if you need an advanced one,
follow along or jump to my favorite #3 method.
Now before heading to the second method, here's quick elementor preloader settings…
Elementor Preloader Settings (Explained)
Each method offers a few preloader customization options:
| Setting | Description |
|---|---|
| Animation Type | Circle, Pulse, Overlap, etc. |
| Duration | How long preloader stays visible |
| Loader Type | Animation, icon, image |
| Background Color | Matches brand theme |
| Display Size | Different size on screen types |
💡Pro Tip: Keep your preloader under 2.5s to avoid frustrating users. If your site is heavy, consider optimizing images or using delay JS with exceptions.
📙 Most Read Elementor Tutorials…
Method 2: Install a Preloader Plugin
You'll want to go the plugin route for more advanced preloader styles and customizations.
Some popular free options include:
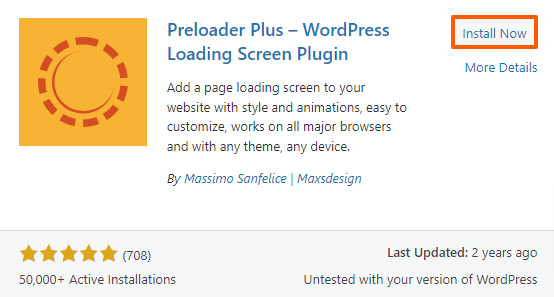
Of all the above-listed plugins, Preloader Plus is the best one out there. Simply, hop on to WP Menu > Plugins > Add New & then look for Preloader plus plugin. Install, Activate & Configure it from your customizer.
Once you're done with your Preloaders design, simply click on Publish & Boom!!
The Preloader will be live on your website using the free preloader plugin.
This one is great but still limited in terms of capabilities.
So, here's my recommended method…
Method 3: Using Elementor Addon: The Plus Addon
Now coming to the final & recommended method; i.e. adding a preloader using the elementor addons.
Coming to the addons, there are a dozen of elementor addons, out of which the only Elementor addon that provides this functionality is ThePlusAddons for Elementor (TPAE).
Here’s a glimpse of how to add a preloader in elementor using the preloader widget…
- Install & Activate the PlusAddons for Elementor
- Enable the Preloader widget in the Plus Widgets Settings
- Add the Preloader widget to your desired section/page
- Customize the preloader to match your site’s branding.
Personally, If you ask me, I’d recommend using the PlusAddons to add Preloader to your elementor website as it not only offers the preloader widget, but it comes to jampack with over 120+ widgets & extensions all at the same cost.
Additionally, if you use my affiliate link & this exclusive coupon – BESTADDON20;
you get a 20% annual discount + a 20% renewal discount on all pro plans.
Moving ahead, here’s the step-by-step guide on adding a preloader in elementor using the plusaddons preloader widget…
How to Add Preloader to the Elementor Website?
Activating the Preloader widget in ThePlusAddons.
Step 1: Click on this Special Link & Use code: BESTADDON20 to grab ThePlusAddons for Elementor at a 20% annual & 20% renewal discount.
Step 2: Install & Activate the PlusAddons plugin (both free & pro version)
Step 3: Head over to your WordPress Dashboard & from the WP menu,
Click on “The Plus Settings” > then “Plus Widgets“.
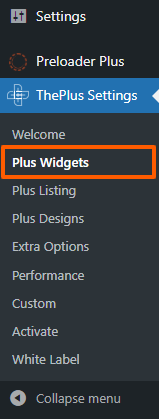
Step 4: Search & Locate for “Preloader” and toggle it on.

Step 3: Click on the “SAVE” button floating at the bottom to save your changes.
Additional Note: Under “The Plus Settings” >>“Extra options” you can explore three more additional options to customize your preloader and set it where you want.
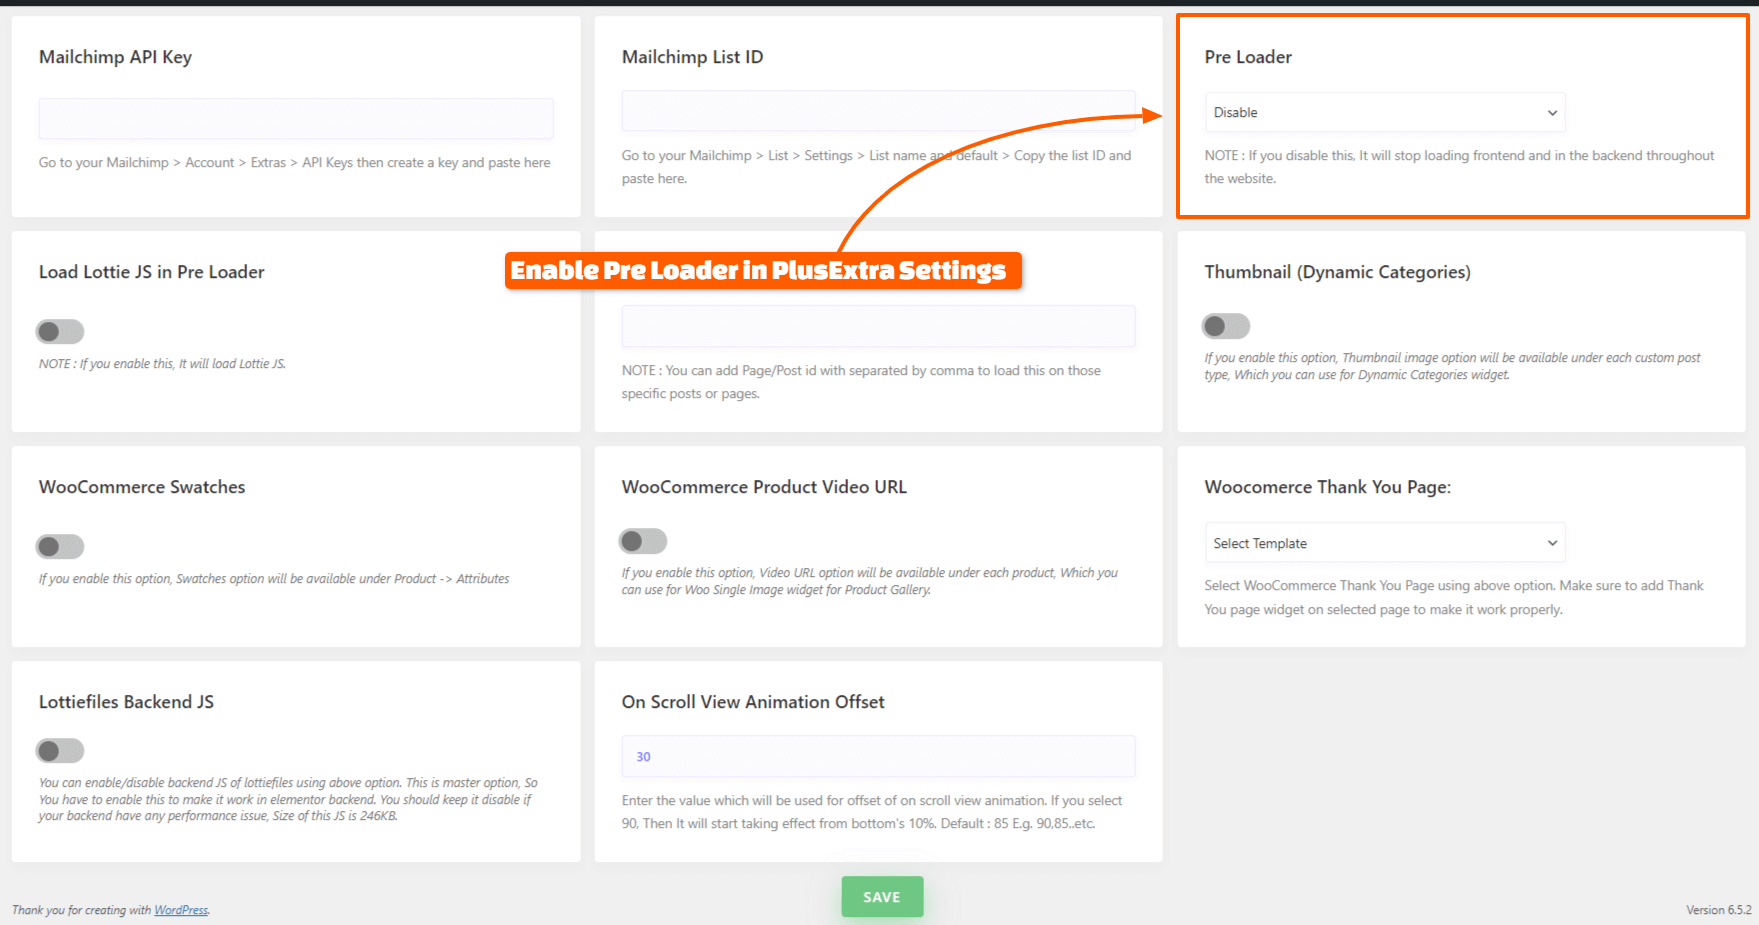
- Preloader: Turn it on to enable Preloader in Elememtor Editor
- Load Lottie Js in PreLoader: Enable Lottie Js animation for a dynamic preloader experience.
- PreLoader in Specific Page/Post: Customize preloader visibility on specific pages or posts by adding Page/Post ID.
After configuring your preferences, don't forget to click on the “SAVE” button to apply changes.
Adding the Preloader in Elementor:
Step 1: Navigate to your Elementor Editor (you can open your homepage if it’s built using Elementor)
Step 2: Search for the “Preloader” widget in the widgets panel & then drag & drop on the page you want or probably at the top of your homepage.
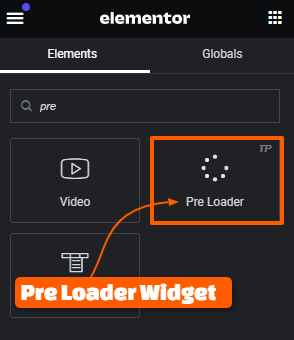
Step 3: Choose your preloader type (from the 8 available preloader types) & then Customize the preloader settings such as the animation style, size & color, to match your site’s branding.
With these 3 simple steps, you can add a preloader to your elementor website.
Now to match your website's style and branding, here’s how to customize it…
Styling & Customizing Elementor Preloader:
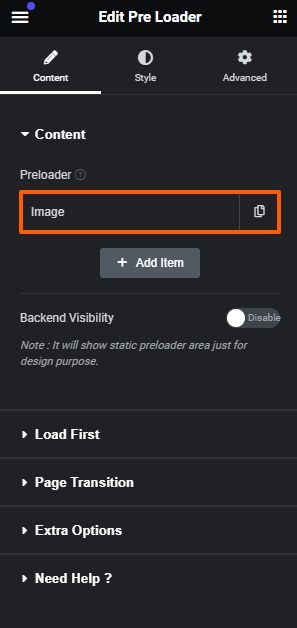
Where the PlusAddons preloader widget shines is the customization options available for fine-tuning your loading screen.
Depending on your preloader type, you can adjust colors, animation speeds, sizes, loader positioning, background styles, and much more.
Here are the available styling options…
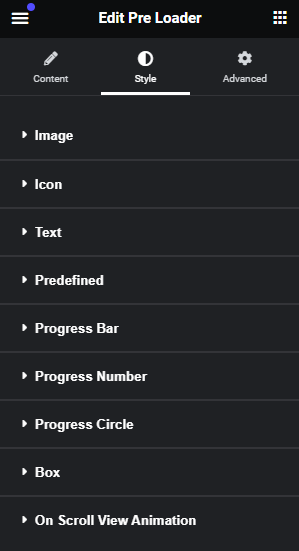
For example, with a logo image preloader, you can have it load in with a cool fade or slide animation instead of just appearing.
With text preloaders, you can pick custom web fonts and weights. The level of control is incredibly granular.
Pro Tip: Page Transitions with Preloader!
Talking about the Page transitions; they are slick micro-animations you sometimes see when clicking a link to a new page.
They provide a subtle hint of visual continuity instead of just a hard cut between pages.
With an entrance animation on one end and an exit animation on the other, it creates a cohesive sequence that looks & feels a bit extra polished.
You know what?
The PlusAddons preloader widget also allows you to set up page transition animations between navigating to different pages on your Elementor site.
You can access and configure entrance and exit transition styles like fades, slides, animation effects, and more directly in the preloader widget options.
Yet another way to “wow” visitors!
Using the widget options, you'll find two sets of controls – one for the “in” transition when a new page loads, and one for the “out” transition when existing a page.
For the entrance animations, you can choose from effects like
simple fade-ins, subtle slides, triple swoosh, or duo moves.
The exit animations have an equally versatile selection of styles to pick from.
So even if you opt for a super simple preloader like a logo or progress bar, you can complement it with an ultra fancy page transition when navigating between your site's pages.
It's a great addition & you can use page transitions along with the Preloaders.
🚀 Useful Elementor Tutorials to Level up your Elementor Game…
Bonus: Pro Tips for Using Elementor Preloaders!
To get the most out of preloaders on your Elementor site:
- Coordinate preloader styles, icons, and colors with your brand palette
- Limit preloader timeout to 3-5 secs max, otherwise, you risk annoying visitors
- Test preloaders on different devices, connections, and scenarios
- Utilize preloaders strategically on key pages like home pages, marketing pages, etc.
Troubleshooting: Why is my Elementor Preloader not Working?
If your Elementor preloader doesn't seem to be working properly, there are a few potential culprits:
- Plugin conflicts – try deactivating other plugins one by one to identify any issues
- Theme conflicts – switch to a default theme like Twenty Twenty-Four
- Browser caching issues – clear all caches and reload & also test on different browsers
- Invalid code snippets – double check any custom code you've added
- Server throttling – ask your host if they limit animations/loading screens
FAQs: Elementor Preloader
1) What is a preloader in Elementor?
In simple terms; A preloader in Elementor is a visual element that appears while your website is loading, typically in the form of an animation or loading indicator. It helps to engage users and improve the perceived performance of your website.
2) Why do we need a preloader?
Preloaders serve several purposes, such as enhancing user experience, reducing bounce rates, and creating a more polished and professional appearance for your website.
Though it’s not required to add to your website, adding it will only enhance your UX.
3) What is the difference between a loader and a preloader?
A loader is a general term for any visual element that indicates the content is loading, while a preloader specifically refers to a loading indicator that appears before the main content of a webpage is fully loaded.
4) What is a page-loading animation in WordPress?
A page-loading animation, also known as a preloader, is a visual element that appears while a WordPress website is loading its content. It helps to provide a smooth and engaging user experience during the loading process.
5) Will adding a preloader slow down my website?
Not really. When implemented correctly, preloaders have minimal impact on website speed and can enhance user perception of loading times. Keep it under100KB.
More advanced options like Lottie files can add some bloat if not optimized well.
So, for optimizing your site, you can use my #1 recommended speed optimization plugin – FlyingPress.
6) Can I customize the preloader animation?
Yes, most preloader plugins/addons offer customization options to tailor the animation to your preferences.
The best one for customizing preloaders is ThePlusAddons preloader widget.
7) Which is the best method to add a preloader to the Elementor site?
Although there are 3 methods, using the preloader widget by ThePlusAddons is the best method to add a preloader to the Elementor site as it offers advanced customization options & a bunch of animations to choose from. Just set it & you’re all done.
Final Thoughts
Incorporating a preloader into your Elementor-powered website can elevate the UX and leave a lasting impression on your visitors.
By leveraging the PlusAddons Preloader widget and exploring Elementor Pro's page transition features, you can create a captivating website that sets you apart from the competition.
To be honest, by the end of the post, even I’m planning to add a preloader to my blog 😅.
Maybe I’ll or maybe not, whatever the case is, I’ll update once I do & also share how I did it.
Anyway, forget about my planning & do remember to experiment, optimize for performance, and continuously refine your preloader to ensure it aligns with your brand's identity and design if you’re adding it.
I hope this in-depth guide of over 2,000+ words helped you choose the best elementor preloader – ThePlusAddons preloader widget & by the end of this post, you should be able to add it to your site.
Let me know which method you’ll use to add a preloader.
Also, feel free to drop in your site’s URL in the comments down below so that I & other elementor folks can give it a look.
And yeah! I promise to keep the URL (if it’s genuine so that you can expect some free traffic)
If you found it useful, do give it a share on your favorite social network. It really helps.
Cheers,
Kuldeep
🔌 Elementor Widgets to Enhance your Elementor Website…

About the Author
Kuldeep Rathore is a WordPress & Elementor expert and co-founder of 60Pixel. With 3+ years of hands-on experience, he builds fast, SEO-optimized websites for creators and small businesses. Through this blog, he shares practical tutorials and tips trusted by the WordPress community worldwide.

good article. thank you.
I’m glad you found it helpful 🙂